チュートリアルのサブセクション
ランダムサーチ (RS)
情報
ASE は初心者にとって始めやすいツールである.
CrySPYのインストール時に,ASEも自動的にインストールされるためである.
高い精度はないが,非常に軽量で高速な原子間ポテンシャルを備えており,ノートPCなどの低スペックな環境でも動作確認に適している.
入力ファイルの準備
下記のどれか一つに従い,その後CrySPY実行のセクションに移ること.
CrySPY実行
- Check cryspy.in
- (version 0.10.3 or earlier) Script to run
- First run
- Submit job
- Check results
- Append structures
- Analysis and visualization
ランダムサーチ (RS)のサブセクション
ASE on your local PC
2025年7月11日 更新 v1.4.2
ASEは様々なコードのインターフェースを提供しているPythonライブラリであり,
Pure Python EMT calculatorというシンプルなEMTの計算も実行できる.CrySPYさえインストールしてあれば,精度はともかく簡単に計算できるので,CrySPYのテストにちょうど良い.
このチュートリアルでは,MacやLinuxなどのOSのローカルPCを用いてCu 8原子の構造探索を試す.
Assumption
ここでは次のような条件を想定している:
- CrySPY 1.2.0 or later in your local PC
- CrySPY job filename:
job_cryspy - ase input filename:
ase_in.py
どこか適当なワーキングディレクトリに移動して,まずはexampleをコピーしてくる.下記のどちらからコピーしてきても良い.
.
├── calc_in
│   ├── ase_in.py
│   └── job_cryspy
└── cryspy.in
cryspy.in
cryspy.inはCrySPYの入力ファイル.
[basic]
algo = RS
calc_code = ASE
tot_struc = 5
nstage = 1
njob = 5
jobcmd = zsh
jobfile = job_cryspy

[structure]
atype = Cu
nat = 8

[ASE]
ase_python = ase_in.py

[option]
[basic] セクションのjobcmd = zshは環境に合わせてjobcmd = shやjobcmd = bash等に変更する.
CrySPYは内部でバックグラウンドジョブとしてzsh job_cryspyを実行する.
ASEを使う場合は,[ASE]セクションが必要.
下記の二つのファイル名は好きなように変えても良い.
jobfile: job_cryspyase_python: ase_in.py
他の入力変数については後で説明を行う.
calc_in directory
ASEのジョブファイルや入力ファイルはこのディレクトリに準備する.
Job file
ジョブファイルの名前はcryspy.inのjobfileに一致させる必要がある.
ジョブファイルの例は下記の通り.
#!/bin/sh

# ---------- ASE
python3 ase_in.py
ase_in.pyというファイル名も自由に変えられるが, cryspy.inのase_pythonの値と一致させておく必要がある.
CrySPYではジョブファイルの最後の行はsed -i -e ‘3 s/^.*$/done/’ stat_jobとしておくルールになっている.
バージョン1.4.2からCrySPYがジョブファイルの末尾に自動的に下記を追記するようになった.(参考:機能 > ジョブファイルの自動書き換え)
# ---------- CrySPY
sed -i -e '3s/^sub.*/done/' stat_job
メモ
1.4.2より古いバージョンでは,ジョブファイルの最後の行はsed -i -e '3s/^sub.*/done/' stat_jobと書いておくルールになっている.自分でsedコマンド文を書いたジョブファイルを1.4.2以上のバージョンで使用しても2回実行されるだけなので問題はない.
上記sedコマンドの意味は,stat_jobというファイルの3行目のsubから始まる部分をdoneに変える処理.
ヒント
(詳細:機能 > ジョブファイルの自動書き換え)
CrySPYのジョブファイルのCrySPY_IDという文字列は自動的に構造IDに置き換わるようになっている.
PBSやSLURMといったジョブスケジューラーを使う場合,ジョブ名にCrySPY_IDと書いておくとどの構造のジョブなのかが分かり便利である.
例えば,PBSでは#PBS -N Si_CrySPY_IDのように書いておくと,ジョブをサブミットする際,#PBS -N Si_10のように置き換わる.
注意点として,ジョブ名を数字から始めるとエラーとなることが多いので,Si_のように何か文字列を頭につけておくこと.
ステージ数(nstage in cryspy.in)に応じた数のインプットファイルが必要となる.
インプットファイル名の先頭にx_,または語尾に_xをつけて準備する.
ここでxはステージ数.
CrySPYが探すインプットファイル名の優先順位は以下の通り.
x_ase_in.pyase_in.py_xase_in.py
各ステージで共通のインプットを使用するのであればx_や_xを省略できる.
このASEのチュートリアルではnstage = 1を用いるので,ASEのインプットファイルはase_in.pyの一つだけでよい.x_や_xを省略したファイルを準備している.
ase_in.pyは例えば下記の通り(ASEの使い方の詳細は公式のドキュメントを見ること).
from ase.constraints import FixSymmetry
from ase.filters import FrechetCellFilter
from ase.calculators.emt import EMT
from ase.optimize import BFGS
from ase.io import read, write

# ---------- input structure
# CrySPY outputs 'POSCAR' as an input file in work/xxxxxx directory
atoms = read('POSCAR', format='vasp')

# ---------- setting and run
atoms.calc = EMT()
atoms.set_constraint([FixSymmetry(atoms)])
cell_filter = FrechetCellFilter(atoms, hydrostatic_strain=False)
opt = BFGS(cell_filter)

# ---------- run
converged = opt.run(fmax=0.01, steps=2000)

# ---------- rule in ASE interface
# output file for energy: 'log.tote' in eV/cell
#                         CrySPY reads the last line of 'log.tote' file
# outimized structure: 'CONTCAR' file in vasp format
# check_opt: 'out_check_opt' file ('done' or 'not yet')
#                         CrySPY reads the last line of 'out_check_opt' file

# ------ energy
e = cell_filter.atoms.get_total_energy()    # eV/cell
with open('log.tote', mode='w') as f:
    f.write(str(e))

# ------ struc
opt_atoms = cell_filter.atoms.copy()
opt_atoms.set_constraint(None)    # remove constraint for pymatgen
write('CONTCAR', opt_atoms, format='vasp', direct=True)

# ------ check_opt
with open('out_check_opt', mode='w') as f:
    if converged:
        f.write('done\n')
    else:
        f.write('not yet\n')
ASEはVASPやQEなどと違って,入力ファイル(python script)は自分で書くことになるので自由度がある.
CrySPYでは3つのルールを設けている.
- エネルギーはeV/cellの単位で
log.toteというファイルに出力する.CrySPYはこのファイルの最後の行を読む. - 最適化後の構造データは
CONTCARというファイルにVASPフォーマットで出力する. - 最適化の収束判定結果を
out_check_optというファイルにdoneかnot_yetで書き込む.CrySPYはこのファイルの最後の行を読む.
CrySPY実行
ここまで準備ができたらCrySPY実行へ進む.
soiap on your local PC
2025年3月6日 更新
soiapは原子間ポテンシャルを使用した計算ができるソフトウェアであり,計算が軽いのでCrySPYのテストにちょうど良い.
soiapのインストールや詳細はinstructionsを参照.
このチュートリアルでは,MacやLinuxのローカルPC上でCrySPYを試す.
テストシステムはSi 8原子.
Assumption
ここでは次のような条件を想定している:
- (only version 0.10.3 or earlier) CrySPY main script:
~/CrySPY_root/CrySPY-0.9.0/cryspy.py - CrySPY job filename:
job_cryspy - soiap executable file:
~/local/soiap-0.3.0/src/soiap - soiap input filename:
soiap.in - soiap output filename:
soiap.out - soiap input structure filename:
initial.cif
どこか適当なワーキングディレクトリに移動して,まずはexampleをコピーしてくる.下記のどちらからコピーしてきても良い.
- Download from Cryspy_utility/examples/soiap_Si8_RS
- Copy from CrySPY utility that you installed
- (only version 0.10.3 or earlier)
cp -r ~/CrySPY_root/CrySPY-0.9.0/example/v0.9.0/soiap_RS_Si8 .
.
├── calc_in
│   ├── job_cryspy
│   └── soiap.in_1
└── cryspy.in
cryspy.in
cryspy.inがCrySPYの入力ファイル.
[basic]
algo = RS
calc_code = soiap
tot_struc = 5
nstage = 1
njob = 2
jobcmd = zsh
jobfile = job_cryspy

[structure]
atype = Si
nat = 8

[soiap]
soiap_infile = soiap.in
soiap_outfile = soiap.out
soiap_cif = initial.cif

[option]
[basic] セクションのjobcmd = zshは環境に合わせてjobcmd = shやjobcmd = bash等に変更する. CrySPYは内部でバックグラウンドジョブとしてzsh job_cryspyを実行する.
soiapを使う場合は[soiap]セクションが必要となる.下記のファイル名は好きなように変えても良い.
jobfilesoiap_infilesoiap_outfilesoiap_cif
他の入力変数については後で説明を行う.
calc_in directory
soiapのジョブファイルや入力ファイルはこのディレクトリに準備する.
Job file
ジョブファイルの名前はcryspy.inのjobfileに一致させる必要がある.
ジョブファイルの例は下記の通り.
#!/bin/sh

# ---------- soiap
EXEPATH=/path/to/soiap
$EXEPATH/soiap soiap.in 2>&1 > soiap.out

# ---------- CrySPY
sed -i -e '3 s/^.*$/done/' stat_job
/path/to/soiapはsoiapの実行ファイルのpathに変えること.
入力ファイル(soiap.in)と出力ファイル(soiap.out)はcryspy.inで指定したsoiap_infileとsoiap_outfileに合わせること.
最後の行以外は普段使っているようなジョブスクリプトで良いが,
CrySPYではジョブファイルの最後の行はsed -i -e '3 s/^.*$/done/' stat_jobとしておくルールになっている.
メモ
ジョブファイルの最後の行はsed -i -e '3 s/^.*$/done/' stat_jobと書いておく.
ヒント
CrySPYのジョブファイルのCrySPY_IDという文字列は自動的に構造IDに置き換わるようになっている.
PBSやSLURMといったジョブスケジューラーを使う場合,ジョブ名にCrySPY_IDと書いておくとどの構造のジョブなのかが分かり便利である.
例えば,PBSでは#PBS -N Si_CrySPY_IDのように書いておくと,ジョブをサブミットする際,#PBS -N Si_10のように置き換わる.
注意点として,ジョブ名を数字から始めるとエラーとなることが多いので,Si_のように何か文字列を頭につけておくこと.
ステージ数(nstage in cryspy.in)に応じた数のインプットファイルが必要となる.
インプットファイル名の語尾に_xをつけて準備する.
ここでxはステージ数.
soiapのチュートリアルではnstage = 1を用いるので,インプットファイルはsoiap.in_1の一つだけが必要.
soiap.in_1は例えば下記の通り.
crystal initial.cif ! CIF file for the initial structure
symmetry 1 ! 0: not symmetrize displacements of the atoms or 1: symmetrize

md_mode_cell 3 ! cell-relaxation method
               ! 0: FIRE, 2: quenched MD, or 3: RFC5
number_max_relax_cell 100 ! max. number of the cell relaxation
number_max_relax 1 ! max. number of the atom relaxation
max_displacement 0.1 ! max. displacement of atoms in Bohr

external_stress_v 0.0 0.0 0.0 ! external pressure in GPa

th_force 5d-5 ! convergence threshold for the force in Hartree a.u.
th_stress 5d-7 ! convergence threshold for the stress in Hartree a.u.

force_field 1 ! force field
              ! 1: Stillinger-Weber for Si, 2: Tsuneyuki potential for SiO2,
              ! 3: ZRL for Si-O-N-H, 4: ADP for Nd-Fe-B, 5: Jmatgen, or
              ! 6: Lennard-Jones
1行目に書く初期構造ファイル(initial.cif)はcryspy.inのsoiap_cifの値と揃える.
CrySPY実行
ここまで準備ができたらCrySPY実行へ進む.
VASP
2025年7月12日 更新
このチュートリアルでは,PBSなどのジョブスケジューラーを備えたPCクラスターを想定してCrySPYを試す.第一原理計算のVASPを用いて,Na8Cl8(16原子)の構造探索を行う.
Assumption
ここでは次のような条件を想定している:
- CrySPY 1.2.0 or later in your PC cluster
- CrySPY job command:
qsub - CrySPY job filename:
job_cryspy - executable file, vasp_std in your PC cluster
どこか適当なワーキングディレクトリに移動して,まずはexampleをコピーしてくる.下記のどちらからコピーしてきても良い.
.
├── calc_in
│   ├── 1_INCAR
│   ├── 2_INCAR
│   ├── POTCAR_dummy
│   └── job_cryspy
└── cryspy.in
cryspy.in
cryspy.inはCrySPYの入力ファイル.
[basic]
algo = RS
calc_code = VASP
tot_struc = 5
nstage = 2
njob = 2
jobcmd = qsub
jobfile = job_cryspy

[structure]
atype = Na Cl
nat = 8 8
mindist_1 = 2.5 1.5
mindist_2 = 1.5 2.5

[VASP]
kppvol = 40 80

[option]
[basic] セクションのjobcmd = qsubは環境に合わせて変更する.
CrySPYは内部でバックグラウンドジョブとしてqsub job_cryspyを実行する.
下記のファイル名は好きなように変えても良い.
構造最適化計算はステージ制を採用しており,ここではnstage = 2を用いている.
例えば,最初のステージでは,セルを固定し内部座標だけ緩和する設定で,k点も少ない計算を実行し,2ステージ目でセルも含めてフルに構造緩和して,精度も高めるようなことが可能となっている.
VASPを使う場合は,[VASP]セクションが必要.
ここでは各ステージにおけるk点のグリッド密度(Å^-3)をkppvolに指定する必要がある.
他のインプット変数に関しては後ほど説明する.
calc_in directory
ジョブファイルやVASPのインプットをこのディレクトリに置く.
Job file
ジョブファイルの名前はcryspy.inのjobfileに一致させる必要がある.
ジョブファイルの例は下記の通り.
#!/bin/sh
#$ -cwd
#$ -V -S /bin/bash
####$ -V -S /bin/zsh
#$ -N Na8Cl8_CrySPY_ID
#$ -pe smp 20
####$ -q ibis1.q
####$ -q ibis2.q
####$ -q ibis3.q
####$ -q ibis4.q

# ---------- vasp
VASPROOT=/usr/local/vasp/vasp.6.4.2/bin
mpirun -np $NSLOTS $VASPROOT/vasp_std
VASPROOTは環境に合わせて変更する.普段VASPのジョブを流しているジョブファイルを使えば良い.
CrySPYではジョブファイルの最後の行はsed -i -e ‘3 s/^.*$/done/’ stat_jobとしておくルールになっている.
バージョン1.4.2からCrySPYがジョブファイルの末尾に自動的に下記を追記するようになった.(参考:機能 > ジョブファイルの自動書き換え)
# ---------- CrySPY
sed -i -e '3s/^sub.*/done/' stat_job
メモ
1.4.2より古いバージョンでは,ジョブファイルの最後の行はsed -i -e '3s/^sub.*/done/' stat_jobと書いておくルールになっている.自分でsedコマンド文を書いたジョブファイルを1.4.2以上のバージョンで使用しても2回実行されるだけなので問題はない.
上記sedコマンドの意味は,stat_jobというファイルの3行目のsubから始まる部分をdoneに変える処理.
ヒント
(詳細:機能 > ジョブファイルの自動書き換え)
CrySPYのジョブファイルのCrySPY_IDという文字列は自動的に構造IDに置き換わるようになっている.
PBSやSLURMといったジョブスケジューラーを使う場合,ジョブ名にCrySPY_IDと書いておくとどの構造のジョブなのかが分かり便利である.
例えば,PBSでは#PBS -N Si_CrySPY_IDのように書いておくと,ジョブをサブミットする際,#PBS -N Si_10のように置き換わる.
注意点として,ジョブ名を数字から始めるとエラーとなることが多いので,Si_のように何か文字列を頭につけておくこと.
ステージ数(nstage in cryspy.in)に応じた数のインプットファイルが必要となる.
インプットファイル名の先頭にx_,または語尾に_xをつけて準備する.
ここでxはステージ数.
CrySPYが探すインプットファイル名の優先順位は以下の通り.
x_INCARINCAR_xINCAR
各ステージで共通のインプットを使用するのであればx_や_xを省略できる.
今はnstage = 2を用いているので,1_INCAR_1と2_INCARが必要となる.
ここでは,1_INCARはセルを固定して内部座標だけ緩和する設定,2_INCARはセルも含めてフルに緩和する設定になっている.
1_INCAR
SYSTEM = NaCl
!!!LREAL = Auto
Algo = Fast
NSW = 40

LWAVE = .FALSE.
!LCHARG = .FALSE.

ISPIN =  1

ISMEAR = 0
SIGMA = 0.1

IBRION = 2
ISIF = 2

EDIFF = 1e-5
EDIFFG = -0.01
2_INCAR
SYSTEM = NaCl
!!LREAL = Auto
Algo = Fast
NSW = 200

ENCUT = 341

!!LWAVE = .FALSE.
!!LCHARG = .FALSE.


ISPIN =  1

ISMEAR = 0
SIGMA = 0.1

IBRION = 2
ISIF = 3

EDIFF = 1e-5
EDIFFG = -0.01
CrySPYはPOSCARとKPOINTSファイルを自動生成する.
POTCARファイルはユーザーが準備する必要がある.
このexampleに含まれているPOTCARは空のファイルなので,各自で準備すること.
警告
exampleに含まれているPOTCARは空のファイル.配布できない.
CrySPY実行
ここまで準備ができたらCrySPY実行に進む.
QE
2025年7月18日 更新
このチュートリアルでは,PBSなどのジョブスケジューラーを備えたPCクラスターを想定してCrySPYを試す.第一原理計算のQUANTUM ESPRESSOを用いて,Si 8原子の構造探索を行う.
Assumption
ここでは次のような条件を想定している:
- CrySPY job command:
qsub - CrySPY job filename:
job_cryspy - QE executable file:
/usr/local/qe-6.5/bin/pw.x - QE input filename:
pwscf.in - QE output filename:
pwscf.out
どこか適当なワーキングディレクトリに移動して,まずはexampleをコピーしてくる.下記のどちらからコピーしてきても良い.
.
├── calc_in
│   ├── job_cryspy
│   ├── 1_pwscf.in
│   └── 2_pwscf.in
└── cryspy.in
cryspy.in
cryspy.inはCrySPYの入力ファイル.
[basic]
algo = RS
calc_code = QE
tot_struc = 5
nstage = 2
njob = 2
jobcmd = qsub
jobfile = job_cryspy

[structure]
atype = Si
nat = 8

[QE]
qe_infile = pwscf.in
qe_outfile = pwscf.out
kppvol =  40  80

[option]
[basic] セクションのjobcmd = qsubは環境に合わせて変更する.
CrySPYは内部でバックグラウンドジョブとしてqsub job_cryspyを実行する.
構造最適化計算はステージ制を採用しており,ここではnstage = 2を用いている.
例えば,最初のステージでは,セルを固定し内部座標だけ緩和する設定で,k点も少ない計算を実行し,2ステージ目でセルも含めてフルに構造緩和して,精度も高めるようなことが可能となっている.
QEを使う場合は,[QE]セクションが必要.
ここでは各ステージにおけるk点のグリッド密度(Å^-3)をkppvolに指定する必要がある.
下記のファイル名は好きなように変えても良い.
jobfileqe_infileqe_outfile
他のインプット変数に関しては後ほど説明する.
calc_in directory
ジョブファイルやQEのインプットをこのディレクトリに置く.
Job file
ジョブファイルの名前はcryspy.inのjobfileに一致させる必要がある.
ジョブファイルの例は下記の通り.
#!/bin/sh
#$ -cwd
#$ -V -S /bin/bash
####$ -V -S /bin/zsh
#$ -N Si8_CrySPY_ID
#$ -pe smp 20
####$ -q ibis1.q
####$ -q ibis2.q

mpirun -np $NSLOTS /path/to/pw.x < pwscf.in > pwscf.out


if [ -e "CRASH" ]; then
    sed -i -e '3 s/^.*$/skip/' stat_job
    exit 1
fi
/path/to/pw.xは環境に合わせて変更する.
入力(pwscf.in)出力(pwscf.out)ファイルの名前は好きに変えて良いが,cryspy.inのqe_infileとqe_outfileに合わせる必要がある.
普段QEのジョブを流しているジョブファイルを使えば良い.
CrySPYではジョブファイルの最後の行はsed -i -e ‘3 s/^.*$/done/’ stat_jobとしておくルールになっている.
バージョン1.4.2からCrySPYがジョブファイルの末尾に自動的に下記を追記するようになった.(参考:機能 > ジョブファイルの自動書き換え)
# ---------- CrySPY
sed -i -e '3s/^sub.*/done/' stat_job
メモ
1.4.2より古いバージョンでは,ジョブファイルの最後の行はsed -i -e '3s/^sub.*/done/' stat_jobと書いておくルールになっている.自分でsedコマンド文を書いたジョブファイルを1.4.2以上のバージョンで使用しても2回実行されるだけなので問題はない.
上記sedコマンドの意味は,stat_jobというファイルの3行目のsubから始まる部分をdoneに変える処理.
ヒント
(詳細:機能 > ジョブファイルの自動書き換え)
CrySPYのジョブファイルのCrySPY_IDという文字列は自動的に構造IDに置き換わるようになっている.
PBSやSLURMといったジョブスケジューラーを使う場合,ジョブ名にCrySPY_IDと書いておくとどの構造のジョブなのかが分かり便利である.
例えば,PBSでは#PBS -N Si_CrySPY_IDのように書いておくと,ジョブをサブミットする際,#PBS -N Si_10のように置き換わる.
注意点として,ジョブ名を数字から始めるとエラーとなることが多いので,Si_のように何か文字列を頭につけておくこと.
ステージ数(nstage in cryspy.in)に応じた数のインプットファイルが必要となる.
インプットファイル名の先頭にx_,または語尾に_xをつけて準備する.
ここでxはステージ数.
CrySPYが探すインプットファイル名の優先順位は以下の通り.
x_pwscf.inpwscf.in_xpwscf.in
各ステージで共通のインプットを使用するのであればx_や_xを省略できる.
今はnstage = 2を用いているので,1_pwscf.inと2_pwscf.inが必要となる.
ここでは,1_pwscf.inはセルを固定して内部座標だけ緩和する設定,2_pwscf.inはセルも含めてフルに緩和する設定になっている.
1_pwscf.in
 &control
    title = 'Si8'
    calculation = 'relax'
    nstep = 100
    restart_mode = 'from_scratch',
    pseudo_dir = '/usr/local/pslibrary.1.0.0/pbe/PSEUDOPOTENTIALS/'
    outdir='./out.d/'
 /

 &system
    ibrav = 0
    nat = 8
    ntyp = 1
    ecutwfc = 44.0
    occupations = 'smearing'
    degauss = 0.01
 /

 &electrons
 /

 &ions
 /

 &cell
 /

ATOMIC_SPECIES
  Si  28.086  Si.pbe-n-kjpaw_psl.1.0.0.UPF
2_pwscf.in
 &control
    title = 'Si8'
    calculation = 'vc-relax'
    nstep = 200
    restart_mode = 'from_scratch',
    pseudo_dir = '/usr/local/pslibrary.1.0.0/pbe/PSEUDOPOTENTIALS/'
    outdir='./out.d/'
 /

 &system
    ibrav = 0
    nat = 8
    ntyp = 1
    ecutwfc = 44.0
    occupations = 'smearing'
    degauss = 0.01
 /

 &electrons
 /

 &ions
 /

 &cell
 /

ATOMIC_SPECIES
  Si  28.086  Si.pbe-n-kjpaw_psl.1.0.0.UPF
pseudo_dirは各自の環境に合わせて変更する.
Inputs for structure data and k-point such as インプットファイルのATOMIC_POSITIONSとK_POINTSはCrySPYがpymatgenを用いて自動生成するのでユーザーが書く必要はない.
CrySPY実行
ここまで準備ができたらCrySPY実行に進む.
OpenMX
Coming soon.
LAMMPS
Coming soon.
Check cryspy.in
2025年6月16日 更新
詳細は 入力ファイルのページも見ること.
cryspy.inをもう一度チェックしてみよう.ここでの例は選んだcalc_codeに応じて,準備したものと少し異なるかもしれない.
[basic]
algo = RS
calc_code = ASE
tot_struc = 5
nstage = 1
njob = 5
jobcmd = zsh
jobfile = job_cryspy

[structure]
atype = Cu
nat = 8

[ASE]
ase_python = ase_in.py

[option]
[basic] section
algo: アルゴリズム.ランダムサーチの場合はRSを使う.calc_code: 構造最適化のコード. VASP, QE, OMX, soiap, LAMMPS, ASEから選択.tot_struc: 構造数.この場合初回実行で5構造ランダムに生成される.nstage: ステージ数njob: 同時にサブミットするジョブの数.この例では2つのスロットを設定,言い換えると,2構造ずつ最適化を行う.jobcmd: ジョブを実行または投入するコマンド. bash, zsh, qsubなどjobfile: ジョブファイルのファイル名
[structure] section
atype: Atom type. Na8Cl8の例: atype = Na Cl.nat: atypeに応じた原子数. Na8Cl8の例: nat = 8 8
Script to run
メモ
For version 1.0.0 or later, skip this page. The executable script is automatically installed.
Assumption
Here, we assume the following condition:
- CrySPY main script:
~/CrySPY_root/CrySPY-0.9.0/cryspy.py
Make script
Let’s make a convenient shell script to avoid typing long commands over and over again.
Here, we create the script, cryspy (any file name will do).
$ emacs cryspy
$ chmod 744 cryspy
$ cat cryspy
#!/bin/sh

python3 -u ~/CrySPY_root/CrySPY-0.9.0/cryspy.py 1>> log 2>> err
-u option (unbuffered option) can be omitted.
You can put this script in your $PATH, or just use like bash ./cryspy.
Firsrt run
2025 March 6, updated
Make sure you have the following in your working directory.
- calc_in/
- (cryspy)
- cryspy.in
Then, run CyrSPY!
If you use old version (0.10.3 or earlier):
At the first run, CrySPY goes into structure generation mode.
CrySPY stops after 5 structure generation.
If it worked properly, the following output appears on the screen:
[2025-03-06 18:52:21,495][cryspy_init][INFO]


Start CrySPY 1.4.0


[2025-03-06 18:52:21,495][cryspy_init][INFO] # ---------- Library version info
[2025-03-06 18:52:21,495][cryspy_init][INFO] pandas version: 2.2.2
[2025-03-06 18:52:21,495][cryspy_init][INFO] pymatgen version: 2025.1.24
[2025-03-06 18:52:21,495][cryspy_init][INFO] pyxtal version: 1.0.6
[2025-03-06 18:52:21,495][cryspy_init][INFO] # ---------- Read input file, cryspy.in
[2025-03-06 18:52:21,496][write_input][INFO] [basic]
[2025-03-06 18:52:21,496][write_input][INFO] algo = RS
[2025-03-06 18:52:21,496][write_input][INFO] calc_code = ASE
[2025-03-06 18:52:21,496][write_input][INFO] tot_struc = 5
[2025-03-06 18:52:21,496][write_input][INFO] nstage = 1
[2025-03-06 18:52:21,496][write_input][INFO] njob = 2
[2025-03-06 18:52:21,496][write_input][INFO] jobcmd = zsh
[2025-03-06 18:52:21,496][write_input][INFO] jobfile = job_cryspy
...
(omitted)
...
[2025-03-06 18:52:21,497][rs_gen][INFO] # ---------- Initial structure generation
[2025-03-06 18:52:21,497][rs_gen][INFO] # ------ mindist
[2025-03-06 18:52:21,498][struc_util][INFO] Cu - Cu: 1.32
[2025-03-06 18:52:21,498][rs_gen][INFO] # ------ generate structures
[2025-03-06 18:52:21,519][gen_pyxtal][INFO] Structure ID      0: (8,) Space group:  31 -->  31 Pmn2_1
[2025-03-06 18:52:21,525][gen_pyxtal][INFO] Structure ID      1: (8,) Space group: 198 --> 198 P2_13
[2025-03-06 18:52:21,554][gen_pyxtal][INFO] Structure ID      2: (8,) Space group:   4 -->   4 P2_1
[2025-03-06 18:52:21,580][gen_pyxtal][INFO] Structure ID      3: (8,) Space group: 193 --> 191 P6/mmm
[2025-03-06 18:52:21,581][gen_pyxtal][WARNING] Compoisition [8] not compatible with symmetry 172:     spg = 172 retry.
[2025-03-06 18:52:21,625][gen_pyxtal][INFO] Structure ID      4: (8,) Space group:  64 -->  64 Cmce
[2025-03-06 18:52:22,013][cryspy_init][INFO] Elapsed time for structure generation: 0:00:00.516183
Several output files are also generated.
- (
cryspy.out): Short log. only version 0.10.3 or earlier. cryspy.stat: Status file.data/init_POSCARS: Initial struture file in POSCAR format.
You can open this file using VESTAdata/pkl_data: Directory to save pickled data.log_cryspy: log.err_cryspy: error and warning.
Let’s take a look at cryspy.stat file.
[status]
id_queueing = 0 1 2 3 4
Structure ID 0 – 4 are queueing because we just generated structures, and have not submitted yet.
ヒント
Check the initial structures, if the distance between atoms is too close, you should set the mindist in cryspy.in.
Submit job
2024年4月21日更新,日本語化
計算再開
CrySPYはcryspy.statファイルがあれば自動的に計算を再開する.
ヒント
crypy.statがあれば続きから再開.
はじめから計算をしたければcryspy.statを削除する.
ジョブの投入
cryspyをもう一度実行する.
画面かlog_cryspyファイルに下記のように出力される.
[2023-07-10 18:52:51,859][cryspy_restart][INFO]


Restart CrySPY 1.2.0


[2023-07-10 18:52:51,869][ctrl_job][INFO] # ---------- job status
[2023-07-10 18:52:51,904][ctrl_job][INFO] ID      0: submit job, Stage 1
[2023-07-10 18:52:51,931][ctrl_job][INFO] ID      1: submit job, Stage 1
cryspy.statでステータスが確認できる.
...
(omit)
...
[status]
id_queueing = 2 3 4
id      0 = Stage 1
id      1 = Stage 1
cryspy.inでnjob = 2に設定されているので,CrySPYは構造ID 0と1の二つのジョブをサブミットした.
計算はworkディレクトリの中で行われる.各構造IDのディレクトリが作られる.
work
├── 000000
├── 000001
└── fin
二つのジョブが終了したら,もう一度cryspyを実行する.
[2023-07-10 18:55:01,053][cryspy_restart][INFO]


Restart CrySPY 1.2.0


[2023-07-10 18:55:01,058][ctrl_job][INFO] # ---------- job status
[2023-07-10 18:55:01,058][ctrl_job][INFO] ID      0: Stage 1 Done!
[2023-07-10 18:55:01,093][ctrl_job][INFO]     collect results: E = -0.00696997755502915 eV/atom
[2023-07-10 18:55:01,132][ctrl_job][INFO] ID      1: Stage 1 Done!
[2023-07-10 18:55:01,133][ctrl_job][INFO]     collect results: E = 0.4934076667166454 eV/atom
[2023-07-10 18:55:01,144][cryspy][INFO]

recheck 1

[2023-07-10 18:55:01,145][ctrl_job][INFO] # ---------- job status
[2023-07-10 18:55:01,153][ctrl_job][INFO] ID      2: submit job, Stage 1
[2023-07-10 18:55:01,161][ctrl_job][INFO] ID      3: submit job, Stage 1
もしnstage = 2のようにnstageを2以上に設定していれば,ID 0と1のstage 2のジョブがサブミットされる.
今回はnstage = 1なので,ID 0と1の計算データを収集して,次のIDのジョブをサブミットする.
計算が終わった構造のディレクトリはfinディレクトリに移動される.
5構造全ての計算が終わるまでcryspyを繰り返し実行する.
すべての計算が終わって,計算結果の詳細が必要なければworkディレクトリを削除しても良い.
何度も何度もcryspyを繰り返し実行する時は,自動スクリプト(repeat_cryspy)が役に立つ.
Check results
Move to data directory. There should be a few more files.
$ cd data
$ ls
cryspy_rslt  cryspy_rslt_energy_asc  init_POSCARS  opt_POSCARS  pkl_data/
cryspy_rslt: Result file.cryspy_rslt_energy_asc: Result file sorted in energy ascending order.init_POSCARS: Initial struture file in POSCAR format.opt_POSCARS: Optimized structure file in POSCAR format.pkl_data/: Directory to save pickled data.
The results are written to text files, cryspy_rslt and cryspy_rslt_energy_asc (and also saved in pickle data in pkl_data directory).
Each result appends to cryspy_rslt file in the order in which one finished earlier.
   Spg_num Spg_sym  Spg_num_opt Spg_sym_opt  E_eV_atom  Magmom      Opt
0      139  I4/mmm          139      I4/mmm  -3.000850     NaN     done
1       98  I4_122           12        C2/m  -3.978441     NaN  not_yet
2       16    P222           16        P222  -3.348616     NaN  not_yet
3       36  Cmc2_1           36      Cmc2_1  -3.520306     NaN  not_yet
4       36  Cmc2_1            4        P2_1  -3.304168     NaN  not_yet
情報
Not ID order in cryspy_rslt
In cryspy_rslt_energy_asc file, the results are sorted in energy ascending order.
cat cryspy_rslt_energy_asc
   Spg_num Spg_sym  Spg_num_opt Spg_sym_opt  E_eV_atom  Magmom      Opt
1       98  I4_122           12        C2/m  -3.978441     NaN  not_yet
3       36  Cmc2_1           36      Cmc2_1  -3.520306     NaN  not_yet
2       16    P222           16        P222  -3.348616     NaN  not_yet
4       36  Cmc2_1            4        P2_1  -3.304168     NaN  not_yet
0      139  I4/mmm          139      I4/mmm  -3.000850     NaN     done
Spg_num and Spg_sym show space group information on initial structures.
Spg_num_opt and Spg_sym_opt are those of optimized structures.
The last column Opt indicates whether or not optimization reached required accuracy.
Append structures
Of course only 5 structures are not enough to find stable structures.
You can append structures whenever you want.
Here let’s append more 5 structures.
For Si-Si mindist, the default value of 1.11 Å is used in the first structure generation (see log_cryspy), which is a little too close.
Let us try to set the mindist to 2.0 Å.
Edit cryspy.in and change the value of tot_struc into 10, and add mindist_1 = 2.0
emacs cryspy.in
cat cryspy.in
[basic]
algo = RS
calc_code = soiap
tot_struc = 10
nstage = 1
njob = 2
jobcmd = zsh
jobfile = job_cryspy

[structure]
atype = Si
nat = 8
mindist_1 = 2.0

[soiap]
soiap_infile = soiap.in
soiap_outfile = soiap.out
soiap_cif = initial.cif

[option]
Then run cryspy, and check log_cryspy file.
...
(omit)
...

2023/03/19 00:01:47
CrySPY 1.0.0
Restart cryspy.py


Changed tot_struc from 5 to 10
Changed mindist from None to [[2.0]]

Backup data

# ---------- Append structures
# ------ mindist
Si - Si 2.0
Structure ID      5 was generated. Space group: 218 --> 221 Pm-3m
Structure ID      6 was generated. Space group:  86 --> 129 P4/nmm
Structure ID      7 was generated. Space group: 129 --> 129 P4/nmm
Structure ID      8 was generated. Space group: 191 --> 191 P6/mmm
Structure ID      9 was generated. Space group:  31 -->  31 Pmn2_1
Remember that CrySPY goes into structure generation mode whenever you change the value of tot_struc.
In this mode, CrySPY does not do any other action such as collecting data, submitting jobs, and so on.
メモ
Structure generation mode whenever you change the value of tot_struc.
From version 1.0.0, CrySPY automatically backs up when adding structures.
See features/backup.
Repeat cryspy & several times until all appended structures are done.
The auto script may help you.
repeat_cryspy
解析と可視化
データのダウンロード
ここでは,CrySPYのデータをローカルPCで解析・可視化することを前提としている.
CrySPYをスーパーコンピュータやワークステーションで使用している場合は,データをローカルPCにダウンロードすること.
work や backup ディレクトリは,ファイルサイズが非常に大きくなる可能性があるため,不要であれば削除してよい.
Jupyter notebook
先ほどダウンロードした結果の中にある data/ ディレクトリに移動する.
その後,CrySPY utilityがローカルにダウンロード してある場合は cryspy_analyzer_RS.ipynb をコピーする.
またはGitHubから直接ダウンロードしてくる(CrySPY_utility/notebook/).
Jupyter を起動し(VScode,Jupyter Lab,Jupyter Notebook など),
セルを順番に実行するだけで,以下のような図を得ることができる.

進化的アルゴリズム(EA)
入力ファイルの準備
下記のどれか一つに従い,その後CrySPY実行のセクションに移ること.
CrySPY実行
進化的アルゴリズム(EA)のサブセクション
ASE on your local PC
2025年7月11日 更新
ここで利用しているファイルはCrySPY_utility/examples/ase_Cu8Au8_EAからダウンロードできる.
このチュートリアルでは,計算が軽いASEのPure Python EMT calculatorを用いてローカルPCで動作確認を行う.対象となるシステムはCu8Au8.
cryspy.in
cryspy.inの例.
[basic]
algo = EA
calc_code = ASE
nstage = 1
njob = 5
jobcmd = zsh
jobfile = job_cryspy

[structure]
atype = Cu Au
nat = 8 8

[EA]
n_pop = 10
n_crsov = 5
n_perm = 2
n_strain = 2
n_rand = 1
n_elite = 1
n_fittest = 5
slct_func = TNM
t_size = 2
maxgen_ea = 0

[ASE]
ase_python = ase_in.py

[option]
calc_in/
calc_in/以下はチュートリアル > ランダムサーチ(RS) > ASE in your local PCと同様
calc_in/ase_in.py
from ase.constraints import FixSymmetry
from ase.filters import FrechetCellFilter
from ase.calculators.emt import EMT
from ase.optimize import BFGS
from ase.io import read, write

# ---------- input structure
# CrySPY outputs 'POSCAR' as an input file in work/xxxxxx directory
atoms = read('POSCAR', format='vasp')

# ---------- setting and run
atoms.calc = EMT()
atoms.set_constraint([FixSymmetry(atoms)])
cell_filter = FrechetCellFilter(atoms, hydrostatic_strain=False)
opt = BFGS(cell_filter)

# ---------- run
converged = opt.run(fmax=0.01, steps=2000)

# ---------- rule in ASE interface
# output file for energy: 'log.tote' in eV/cell
#                         CrySPY reads the last line of 'log.tote' file
# outimized structure: 'CONTCAR' file in vasp format
# check_opt: 'out_check_opt' file ('done' or 'not yet')
#                         CrySPY reads the last line of 'out_check_opt' file

# ------ energy
e = cell_filter.atoms.get_total_energy()    # eV/cell
with open('log.tote', mode='w') as f:
    f.write(str(e))

# ------ struc
opt_atoms = cell_filter.atoms.copy()
opt_atoms.set_constraint(None)    # remove constraint for pymatgen
write('CONTCAR', opt_atoms, format='vasp', direct=True)

# ------ check_opt
with open('out_check_opt', mode='w') as f:
    if converged:
        f.write('done\n')
    else:
        f.write('not yet\n')
calc_in/job_cryspy
#!/bin/sh

# ---------- ASE
python3 ase_in.py > out.log
次世代の生成
2025年4月6日
初回実行
cryspyを実行すると,構造生成モードになり,第一世代のランダム構造が生成されて,一旦プログラムは終了する.
出力
...
[2025-04-06 09:15:34,720][ea_init][INFO] # ---------- Initialize evolutionary algorithm
[2025-04-06 09:15:34,720][ea_init][INFO] # ------ Generation 1
[2025-04-06 09:15:34,720][ea_init][INFO] 10 structures by random
cryspy.statを見ると,EAでは現在の世代の情報が追加されている.
[status]
generation = 1
id_queueing = 0 1 2 3 4 5 6 7 8 9
構造最適化
何度かcryspyを実行して,第一世代の構造最適化を終わらせると,下記のように出力される.
...
[2025-04-06 09:20:26,218][ctrl_job][INFO] Done generation 1
[2025-04-06 09:20:26,218][ctrl_job][INFO]
EA is ready
次世代生成
準備ができた状態でもう一度cryspyを実行すると,バックアップが実行されてから,次世代構造の生成が始まる.
...
[2025-04-06 09:35:11,546][cryspy_restart][INFO] read input, cryspy.in
[2025-04-06 09:35:11,554][ctrl_job][INFO] # ---------- job status
[2025-04-06 09:35:11,554][ctrl_job][INFO] Done generation 1
[2025-04-06 09:35:11,554][utility][INFO] Backup data
[2025-04-06 09:35:11,611][ea_next_gen][INFO] # ---------- Evolutionary algorithm
[2025-04-06 09:35:11,611][ea_next_gen][INFO] Generation 2
[2025-04-06 09:35:11,613][ea_next_gen][INFO] # ------ natural selection
[2025-04-06 09:35:11,687][ea_next_gen][INFO] ranking without duplication (including elite):
[2025-04-06 09:35:11,687][ea_next_gen][INFO] Structure ID      1, fitness:   -0.00530
[2025-04-06 09:35:11,687][ea_next_gen][INFO] Structure ID      3, fitness:    0.01490
[2025-04-06 09:35:11,687][ea_next_gen][INFO] Structure ID      4, fitness:    0.04485
[2025-04-06 09:35:11,687][ea_next_gen][INFO] Structure ID      7, fitness:    0.11501
[2025-04-06 09:35:11,687][ea_next_gen][INFO] Structure ID      8, fitness:    0.15254
[2025-04-06 09:35:11,687][ea_next_gen][INFO] # ------ Generate children
[2025-04-06 09:35:11,687][ea_child][INFO] # -- mindist
[2025-04-06 09:35:11,689][struc_util][INFO] Cu - Cu: 1.32
[2025-04-06 09:35:11,689][struc_util][INFO] Cu - Au: 1.34
[2025-04-06 09:35:11,689][struc_util][INFO] Au - Au: 1.36
[2025-04-06 09:35:11,740][crossover][INFO] Structure ID     10 (8, 8) was generated from      3 and      1 by crossover. Space group:   1 P1
[2025-04-06 09:35:11,764][crossover][WARNING] remove_within_mindist: some atoms within mindist. retry.
[2025-04-06 09:35:11,774][crossover][INFO] Structure ID     11 (8, 8) was generated from      3 and      1 by crossover. Space group:   1 P1
[2025-04-06 09:35:11,789][crossover][INFO] Structure ID     12 (8, 8) was generated from      1 and      4 by crossover. Space group:   1 P1
[2025-04-06 09:35:11,833][crossover][INFO] Structure ID     13 (8, 8) was generated from      1 and      3 by crossover. Space group:   1 P1
[2025-04-06 09:35:11,852][crossover][WARNING] mindist in _add_border_line: Cu - Cu, 0.567032320824818. retry.
[2025-04-06 09:35:11,861][crossover][INFO] Structure ID     14 (8, 8) was generated from      7 and      1 by crossover. Space group:   1 P1
[2025-04-06 09:35:11,875][permutation][INFO] Structure ID     15 (8, 8) was generated from      1 by permutation. Space group: 146 R3
[2025-04-06 09:35:11,888][permutation][INFO] Structure ID     16 (8, 8) was generated from      3 by permutation. Space group:   1 P1
[2025-04-06 09:35:11,890][strain][WARNING] mindist in strain: Cu - Cu, 1.3050485787603692. retry.
[2025-04-06 09:35:11,903][strain][INFO] Structure ID     17 (8, 8) was generated from      3 by strain. Space group:   1 P1
[2025-04-06 09:35:11,917][strain][INFO] Structure ID     18 (8, 8) was generated from      1 by strain. Space group:   1 P1
[2025-04-06 09:35:12,513][ea_child][INFO] # ------ Random structure generation
[2025-04-06 09:35:12,513][rs_gen][INFO] # ------ mindist
[2025-04-06 09:35:12,515][struc_util][INFO] Cu - Cu: 1.32
[2025-04-06 09:35:12,515][struc_util][INFO] Cu - Au: 1.34
[2025-04-06 09:35:12,515][struc_util][INFO] Au - Au: 1.36
[2025-04-06 09:35:12,516][rs_gen][INFO] # ------ generate structures
[2025-04-06 09:35:12,530][gen_pyxtal][INFO] Structure ID     19: (8, 8) Space group:  86 -->  86 P4_2/n
[2025-04-06 09:35:12,533][ea_next_gen][INFO] # ------ Select elites
[2025-04-06 09:35:12,533][ea_next_gen][INFO] Structure ID      9 keeps as the elite
あとはcryspyの実行を繰り返せば,探索が進む.
結果の確認
cryspy_rslt
以下は第3世代まで計算を終えたcryspy_rsltの例である.EAでは世代の情報(Gen)も追加される.
    Gen  Spg_num Spg_sym  Spg_num_opt Spg_sym_opt  E_eV_atom  Magmom      Opt
0     1      214  I4_132          230       Ia-3d   1.168743     NaN  no_file
1     1      198   P2_13          198       P2_13  -0.005303     NaN  no_file
2     1       95  P4_322           95      P4_322   0.389566     NaN  no_file
3     1       27    Pcc2           27        Pcc2   0.014898     NaN  no_file
4     1       60    Pbcn           60        Pbcn   0.044852     NaN  no_file
5     1      116   P-4c2          116       P-4c2   0.403246     NaN  no_file
6     1      187   P-6m2          187       P-6m2   1.054706     NaN  no_file
7     1      161     R3c          160         R3m   0.115009     NaN  no_file
8     1      146      R3          146          R3   0.152535     NaN  no_file
9     1       60    Pbcn           47        Pmmm  -0.005676     NaN  no_file
10    2        1      P1            1          P1   0.026070     NaN  no_file
11    2        1      P1            7          Pc   0.005898     NaN  no_file
12    2        1      P1            1          P1   0.005208     NaN  no_file
13    2        1      P1            1          P1   0.005506     NaN  no_file
14    2        1      P1            1          P1   0.024364     NaN  no_file
15    2      146      R3          146          R3   0.011525     NaN  no_file
16    2        1      P1            1          P1   0.014590     NaN  no_file
17    2        1      P1            1          P1   0.015236     NaN  no_file
18    2        1      P1            2         P-1  -0.012335     NaN  no_file
19    2       86  P4_2/n          140      I4/mcm   0.274548     NaN  no_file
20    3        1      P1            1          P1   0.013611     NaN  no_file
21    3        1      P1           10        P2/m  -0.014166     NaN  no_file
22    3        1      P1            1          P1   0.019472     NaN  no_file
23    3        1      P1            1          P1   0.011641     NaN  no_file
24    3        1      P1            1          P1   0.000297     NaN  no_file
25    3        1      P1            1          P1   0.005596     NaN  no_file
26    3        1      P1            1          P1   0.013374     NaN  no_file
27    3        1      P1            2         P-1   0.005055     NaN  no_file
28    3        2     P-1           12        C2/m  -0.012396     NaN  no_file
29    3      182  P6_322          182      P6_322   0.711472     NaN  no_file
ea_info
各世代ごとに用いたEAのパラメーターがea_infoに出力される.
Gen Population Crossover Permutation Strain Random Elite crs_lat slct_func
  1         10         0           0      0     10     0  random       TNM
  2         10         5           2      2      1     1  random       TNM
  3         10         5           2      2      1     1  random       TNM
ea_origin
構造生成手法や親個体の情報が,ea_originに出力される.
Gen Struc_ID   Operation   Parent
  1        0      random     None
  1        1      random     None
  1        2      random     None
  1        3      random     None
  1        4      random     None
  1        5      random     None
  1        6      random     None
  1        7      random     None
  1        8      random     None
  1        9      random     None
  2       10   crossover   (3, 1)
  2       11   crossover   (3, 1)
  2       12   crossover   (1, 4)
  2       13   crossover   (1, 3)
  2       14   crossover   (7, 1)
  2       15 permutation     (1,)
  2       16 permutation     (3,)
  2       17      strain     (3,)
  2       18      strain     (1,)
  2       19      random     None
  2        9       elite    elite
  3       20   crossover (18, 12)
  3       21   crossover  (12, 9)
  3       22   crossover (12, 18)
  3       23   crossover  (18, 9)
  3       24   crossover (13, 18)
  3       25 permutation    (18,)
  3       26 permutation     (9,)
  3       27      strain    (18,)
  3       28      strain    (18,)
  3       29      random     None
  3       18       elite    elite
解析と可視化
データのダウンロード
ここでは,CrySPYのデータをローカルPCで解析・可視化することを前提としている.
CrySPYをスーパーコンピュータやワークステーションで使用している場合は,データをローカルPCにダウンロードすること.
work や backup ディレクトリは,ファイルサイズが非常に大きくなる可能性があるため,不要であれば削除してよい.
Jupyter notebook
先ほどダウンロードした結果の中にある data/ ディレクトリに移動する.
その後,CrySPY utilityがローカルにダウンロード してある場合は cryspy_analyzer_EA.ipynb をコピーする.
またはGitHubから直接ダウンロードしてくる(CrySPY_utility/notebook/).
Jupyter を起動し(VScode,Jupyter Lab,Jupyter Notebook など),
セルを順番に実行するだけで,以下のような図を得ることができる.

組成可変型進化的アルゴリズム(EA-vc)
入力ファイルの準備
下記のどれか一つに従い,その後CrySPY実行のセクションに移ること.
CrySPY実行
組成可変型進化的アルゴリズム(EA-vc)のサブセクション
ASE on your local PC (Cu-Ag-Au)
2025年7月11日 更新
ここで利用しているファイルはCrySPY_utility/examples/ase_Cu-Ag-Au_EA-vcからダウンロードできる.
このチュートリアルでは,計算が軽いASEのPure Python EMT calculatorを用いてローカルPCで動作確認を行う.対象となるシステムは3元系のCu-Ag-Au.
cryspy.in
cryspy.inの例.
[basic]
algo = EA-vc
calc_code = ASE
nstage = 1
njob = 5
jobcmd = zsh
jobfile = job_cryspy

[structure]
atype = Cu Ag Au
ll_nat = 0 0 0
ul_nat = 8 8 8

[ASE]
ase_python = ase_in.py

[EA]
n_pop = 20
n_crsov = 5
n_perm = 2
n_strain = 2
n_rand = 2
n_add = 3
n_elim = 3
n_subs = 3
target = random
n_elite = 2
n_fittest = 10
slct_func = TNM
t_size = 2
end_point = 0.0 0.0 0.0
maxgen_ea = 0

[option]
calc_in/
calc_in/以下はチュートリアル > ランダムサーチ(RS) > ASE in your local PCと同様
calc_in/ase_in.py
from ase.constraints import FixSymmetry
from ase.filters import FrechetCellFilter
from ase.calculators.emt import EMT
from ase.optimize import BFGS
import numpy as np
from ase.io import read, write

# ---------- input structure
# CrySPY outputs 'POSCAR' as an input file in work/xxxxxx directory
atoms = read('POSCAR', format='vasp')

# ---------- setting and run
atoms.calc = EMT()
atoms.set_constraint([FixSymmetry(atoms)])
cell_filter = FrechetCellFilter(atoms, hydrostatic_strain=False)
opt = BFGS(cell_filter)

# ---------- run
converged = opt.run(fmax=0.01, steps=2000)

# ---------- rule in ASE interface
# output file for energy: 'log.tote' in eV/cell
#                         CrySPY reads the last line of 'log.tote' file
# outimized structure: 'CONTCAR' file in vasp format
# check_opt: 'out_check_opt' file ('done' or 'not yet')
#                         CrySPY reads the last line of 'out_check_opt' file

# ------ energy
e = cell_filter.atoms.get_total_energy()    # eV/cell
with open('log.tote', mode='w') as f:
    f.write(str(e))

# ------ struc
opt_atoms = cell_filter.atoms.copy()
opt_atoms.set_constraint(None)    # remove constraint for pymatgen
write('CONTCAR', opt_atoms, format='vasp', direct=True)

# ------ check_opt
with open('out_check_opt', mode='w') as f:
    if converged:
        f.write('done\n')
    else:
        f.write('not yet\n')
calc_in/job_cryspy
#!/bin/sh

# ---------- ASE
python3 ase_in.py > out.log
ASE-CHGNet(Cu-Au)
2025年7月11日 更新
ここで利用しているファイルはCrySPY_utility/examples/ase_chgnet_Cu-Au_EA-vcからダウンロードできる.
このチュートリアルでは,機械学習ポテンシャルのCHGNetを用いてジョブスケジューラーを備えた計算機クラスタで行うことを想定している.
手持ちのPCでも十分動作するので,そうしたい場合は入力を適宜変更すること.
対象となるシステムは2元系のCu-Au.
事前計算
EA-vcではcryspy.inでend_pointとして,各元素単体の1原子当たりのエネルギーを基準として用いるため,事前に計算する必要がある.
exampleファイルの中に二つのディレクトリがあるはず.
Au_fcc
├── POSCAR
├── chgnet_in.py
└── job_cryspy
Cu_fcc
├── POSCAR
├── chgnet_in.py
└── job_cryspy
結晶構造データ(POSCAR)とその構造最適化を行いエネルギーを求めるpythonスクリプト(chgnet_in.py)およびジョブスクリプト(job_cryspy)があるので適宜使用する計算機の環境に合わせて編集すること.
ジョブを実行する(ジョブサブミットのコマンドは適宜読み替えること).
cd Au_fcc
qsub job_cryspy
cd ../Cu_fcc
qsub job_cryspy
cd ..
計算が無事に終わったら,それぞれのディレクトリにend_pointというファイルができており,ここに構造最適化後の1原子あたりのエネルギー(eV/atom)が出力されている.
cat Au_fcc/end_point
-3.2357187271118164
cat Cu_fcc/end_point
-4.083529472351074
これらをcryspy.inでの入力に用いる.
cryspy.in
cryspy.inの例.
[basic]
algo = EA-vc
calc_code = ASE
nstage = 1
njob = 20
jobcmd = qsub
jobfile = job_cryspy

[structure]
atype = Cu Au
ll_nat = 0 0
ul_nat = 8 8

[ASE]
ase_python = chgnet_in.py

[EA]
n_pop = 20
n_crsov = 5
n_perm = 2
n_strain = 2
n_rand = 2
n_add = 3
n_elim = 3
n_subs = 3
target = random
n_elite = 2
n_fittest = 10
slct_func = TNM
t_size = 2
maxgen_ea = 0
end_point = -4.08352709  -3.23571777

[option]
calc_in/
calc_in/以下はチュートリアル > ランダムサーチ(RS) > ASE in your local PCと同様であるが,少しだけCHGNet用に変更している.
ジョブスクリプトのpython本体のpathも計算機環境に合わせること.
calc_in/chgnet_in.py
# ---------- import
from ase.constraints import FixSymmetry
from ase.filters import FrechetCellFilter
from ase.io import read, write
from ase.optimize import FIRE, BFGS, LBFGS
from chgnet.model import CHGNetCalculator

# ---------- input structure
# CrySPY outputs 'POSCAR' as an input file in work/xxxxxx directory
atoms = read('POSCAR')

# ---------- set up
atoms.calc = CHGNetCalculator()
atoms.set_constraint([FixSymmetry(atoms)])
cell_filter = FrechetCellFilter(atoms)
opt = BFGS(cell_filter, trajectory='opt.traj')

# ---------- run
converged = opt.run(fmax=0.01, steps=2000)

# ---------- rule in ASE interface
# output file for energy: 'log.tote' in eV/cell
#                         CrySPY reads the last line of 'log.tote' file
# outimized structure: 'CONTCAR' file in vasp format
# check_opt: 'out_check_opt' file ('done' or 'not yet')
#                         CrySPY reads the last line of 'out_check_opt' file

# ------ energy
e = cell_filter.atoms.get_total_energy()    # eV/cell
with open('log.tote', mode='w') as f:
    f.write(str(e))

# ------ struc
opt_atoms = cell_filter.atoms.copy()
opt_atoms.set_constraint(None)    # remove constraint for pymatgen
write('CONTCAR', opt_atoms, format='vasp', direct=True)

# ------ check_opt
with open('out_check_opt', mode='w') as f:
    if converged:
        f.write('done\n')
    else:
        f.write('not yet\n')
calc_in/job_cryspy
#!/bin/sh
#$ -cwd
#$ -V -S /bin/bash
####$ -V -S /bin/zsh
#$ -N CuAu_CrySPY_ID
#$ -pe smp 2

# ---------- OpenMP
export OMP_NUM_THREADS=2

# ---------- ASE
/usr/local/Python-3.10.13/bin/python3 chgnet_in.py > out.log
VASP(Fe-Al)
2025年7月12日
バージョン1.4.2でEA-vcはVASPに対応.
ここで利用しているファイルはCrySPY_utility/examples/vasp_Fe-Al_EA-vcからダウンロードできる.
このチュートリアルでは,VASPを用いてジョブスケジューラーを備えた計算機クラスタで行うことを想定している.
対象となるシステムは2元系のFe-Alで,強磁性を仮定した計算を行う.
事前計算
EA-vcではcryspy.inでend_pointとして,各元素単体の1原子当たりのエネルギーを基準として用いるため,事前に計算する必要がある.
exampleファイルの中に二つのディレクトリがあるはず.
Al-fcc
├── POSCAR
├── INCAR
├── POTCAR_dummy
└── job_cryspy
Fe-bcc
├── POSCAR
├── INCAR
├── POTCAR_dummy
└── job_cryspy
結晶構造データ(POSCAR)とその構造最適化を行いエネルギーを求めるインプットファイル(INCAR)およびジョブスクリプト(job_cryspy)があるので適宜使用する計算機の環境に合わせて編集すること.
また,POTCARファイルは配布できないので各自で準備すること.
INCARファイルでは,最終的に使用するカットオフなどの値を単体の計算でも利用しなければならないので注意すること.
ジョブを実行する(ジョブサブミットのコマンドは適宜読み替えること).
cd Al_fcc
qsub job_cryspy
cd ../Fe_bcc
qsub job_cryspy
cd ..
計算が終わったら1原子あたりのエネルギーを計算しておく.
今回はBCCやFCCなので,ユニットセルは1原子で構成されており,全エネルギーの値をそのまま使えばよい.
通常はユニットセルの原子数でセルあたりのエネルギーを割って計算する.
cryspy.in
cryspy.inの例.
[basic]
algo = EA-vc
calc_code = VASP
nstage = 2
njob = 10
jobcmd = qsub
jobfile = job_cryspy

[structure]
atype =  Fe Al
ll_nat =  0  0
ul_nat =  8  8

[VASP]
kppvol = 40 120
vasp_MAGMOM = 4.0 0.0

[EA]
n_pop = 20
n_crsov = 5
n_perm = 2
n_strain = 2
n_rand = 2
n_add = 3
n_elim = 3
n_subs = 3
target = random
n_elite = 2
n_fittest = 10
slct_func = TNM
t_size = 2
maxgen_ea = 0
end_point = -8.24249611  -3.74226843

[option]
for VASP
[VASP]セクションのvasp_MAGMOMにはatypeに対応する元素のMAGMOMの値を入れる.
CrySPYは./work/xxx/INCAR(xxxは構造ID)にINCARをコピーする際に,n*vasp_MAGMOM(nは原子数)を追記する.
例えば, atype = (‘Fe’, ‘Al’),nat = (5, 3),vasp_MAGMOM = (4.0 0.0)の場合,下記のように追記する.
このチュートリアルでは使用していないが,他にもINCARのLDAUL,LDAUUおよびLDAUJに対応している.cryspy.inではvasp_をつけて下記のように使う.
[VASP]
kppvol = 40 120
vasp_MAGMOM = 4.0 0.0
vasp_LDAUL = 2 -1
vasp_LDAUU = 4.0 0.0
vasp_LDAUJ = 0.0 0.0
nat = (5, 0)のように2元系から単体に次元が落ちる場合,CrySPYは./work/xxx/INCARに下記のように追記する.
原子数がゼロの元素に関しては何もしない.
MAGMOM = 5*4.0
LDAUL = 2
LDAUU = 4.0
LDAUJ = 0.0
calc_in/
POTCAR
EA-vcでは各元素に対応するPOTCARファイルをそれぞれ準備する.
ファイル名は
のように末尾にatypeに書いた元素名をつける.
CrySPYは計算する構造の原子数に合わせて,./work/xxx/POTCARを準備する.
つまり,nat = (5, 0)のようにFeだけから構成される構造の場合はPOTCAR_Fe,
nat = (4, 4)のようにFe-Al系の場合はPOTCAR_FeとPOTCAR_Alを繋げてPOTCARにする.
job_cryspy
#!/bin/sh
#$ -cwd
#$ -V -S /bin/bash
####$ -V -S /bin/zsh
#$ -N FeAl_CrySPY_ID
#$ -pe smp 32


# ---------- vasp
VASPROOT=/usr/local/vasp/vasp.6.4.2/bin
mpirun -np $NSLOTS $VASPROOT/vasp_std
INCAR
1_INCAR
SYSTEM = FeAl

Algo = Fast
####LREAL = Auto
ENCUT = 348

ISMEAR = 1
SIGMA = 0.1

NSW = 40
IBRION = 2
ISIF = 2

ISPIN = 2
######MAGMOM =   # cryspy append MAGMOM in work/xx/INCAR

EDIFF = 1e-6
EDIFFG = -0.01

KPAR = 4

LWAVE = .FALSE.
LCHARG = .FALSE.
2_INCAR
SYSTEM = FeAl

Algo = Fast
####LREAL = Auto
ENCUT = 348

ISMEAR = 1
SIGMA = 0.1

NSW = 200
IBRION = 2
ISIF = 3

ISPIN = 2
######MAGMOM =   # cryspy append MAGMOM in work/xx/INCAR

EDIFF = 1e-6
EDIFFG = -0.01

KPAR = 4

LWAVE = .FALSE.
LCHARG = .FALSE.
QE(Fe-Al)
2025年7月18日
バージョン1.4.2でEA-vcはQEに対応.
ここで利用しているファイルはCrySPY_utility/examples/qe_Fe-Al_EA-vcからダウンロードできる.
このチュートリアルでは,QEを用いてジョブスケジューラーを備えた計算機クラスタで行うことを想定している.
対象となるシステムは2元系のFe-Alで,強磁性を仮定した計算を行う.
事前計算
EA-vcではcryspy.inでend_pointとして,各元素単体の1原子当たりのエネルギーを基準として用いるため,事前に計算する必要がある.
exampleファイルの中に二つのディレクトリがあるはず.
Al-fcc
├── pwscf.in
└── job_cryspy
Fe-bcc
├── pwscf.in
└── job_cryspy
インプットファイル(pwscf.in)およびジョブスクリプト(job_cryspy)があるので適宜使用する計算機の環境に合わせて編集すること.
pwscf.inファイルでは,最終的に使用するカットオフなどの値を単体の計算でも利用しなければならないので注意すること.
ジョブを実行する(ジョブサブミットのコマンドは適宜読み替えること).
cd Al_fcc
qsub job_cryspy
cd ../Fe_bcc
qsub job_cryspy
cd ..
計算が終わったら1原子あたりのエネルギーをeV単位に変換しておくこと.
今回はBCCやFCCなので,ユニットセルは1原子で構成されているが,
通常はユニットセルの原子数でセルあたりのエネルギーを割って計算する.
cryspy.in
cryspy.inの例.
[basic]
algo = EA-vc
calc_code = QE
nstage = 2
njob = 10
jobcmd = qsub
jobfile = job_cryspy

[structure]
atype =  Fe Al
ll_nat =  0  0
ul_nat =  8  8

[QE]
kppvol = 40 120
qe_infile = pwscf.in
qe_outfile = pwscf.out

[EA]
n_pop = 20
n_crsov = 5
n_perm = 2
n_strain = 2
n_rand = 2
n_add = 3
n_elim = 3
n_subs = 3
target = random
n_elite = 2
n_fittest = 10
slct_func = TNM
t_size = 2
maxgen_ea = 6
end_point = -3406.14117375  -91.25463006

[option]
for QE
VASPと違ってQEでは組成可変型への対応は簡単で,2元系の探索の場合は常に2元系のインプット,3元系なら常に3元系のインプットを./calc_inに準備すればよい.
ただしnatだけは変更の必要があるので,CrySPYが自動で書き換える.
準備する際は下記のように何か適当な数字でnatを書いておく.
CrySPYは./work/xxx/において,先頭の空白を除いてnatから始まる行を
に自動的に書き換える.
calc_in/
job_cryspy
#!/bin/sh
#$ -cwd
#$ -V -S /bin/bash
####$ -V -S /bin/zsh
#$ -N FeAl_CrySPY_ID
#$ -pe smp 32


QEROOT=/usr/local/qe/q-e-qe-7.3.1/bin
mpirun -np $NSLOTS $QEROOT/pw.x -nk 4 < pwscf.in > pwscf.out


if [ -e "CRASH" ]; then
    sed -i -e '3 s/^.*$/skip/' stat_job
    exit 1
fi
pwscf.in
1_pwscf.in
&control
calculation = 'relax'
nstep = 40
pseudo_dir = '/usr/local/qe/gbrv/all_pbe_UPF_v1.5/'
outdir='./outdir/'
/


&system
ibrav = 0
nat = 1
ntyp = 2
ecutwfc = 40
ecutrho = 200

occupations = "smearing"
smearing    = "mp"
degauss     =  0.01

nspin = 2
starting_magnetization(1) = 0.4
starting_magnetization(2) = 0.0
/


&electrons
mixing_beta = 0.4
/

&ions
/

&cell
/

ATOMIC_SPECIES
Fe -1.0 fe_pbe_v1.5.uspp.F.UPF
Al -1.0 al_pbe_v1.uspp.F.UPF
2_pwscf.in
&control
calculation = 'vc-relax'
nstep = 200
pseudo_dir = '/usr/local/qe/gbrv/all_pbe_UPF_v1.5/'
outdir='./outdir/'
/


&system
ibrav = 0
nat = 1
ntyp = 2
ecutwfc = 40
ecutrho = 200

occupations = "smearing"
smearing    = "mp"
degauss     =  0.01

nspin = 2
starting_magnetization(1) = 0.4
starting_magnetization(2) = 0.0
/


&electrons
mixing_beta = 0.4
/

&ions
/

&cell
/

ATOMIC_SPECIES
Fe -1.0 fe_pbe_v1.5.uspp.F.UPF
Al -1.0 al_pbe_v1.uspp.F.UPF
次世代の生成
2025年6月16日
初回実行
cryspyを実行すると,構造生成モードになり,第一世代のランダム構造が生成されて,一旦プログラムは終了する.
出力をみると,ll_natとul_natの範囲の原子数で構造が生成されているのが確認できる.
...
[2025-06-16 10:04:45,648][cryspy_init][INFO] # ---------- Initial structure generation
[2025-06-16 10:04:45,648][rs_gen][INFO] # ------ mindist
[2025-06-16 10:04:45,650][struc_util][INFO] Cu - Cu: 1.32
[2025-06-16 10:04:45,650][struc_util][INFO] Cu - Ag: 1.385
[2025-06-16 10:04:45,650][struc_util][INFO] Cu - Au: 1.34
[2025-06-16 10:04:45,650][struc_util][INFO] Ag - Ag: 1.45
[2025-06-16 10:04:45,650][struc_util][INFO] Ag - Au: 1.405
[2025-06-16 10:04:45,650][struc_util][INFO] Au - Au: 1.36
[2025-06-16 10:04:45,650][rs_gen][INFO] # ------ generate structures
[2025-06-16 10:04:45,659][gen_pyxtal][WARNING] Compoisition [1 4] not compatible with symmetry 34:     spg = 34 retry.
[2025-06-16 10:04:45,662][gen_pyxtal][WARNING] Compoisition [ 2  2 12] not compatible with symmetry 39:     spg = 39 retry.
[2025-06-16 10:04:45,691][gen_pyxtal][INFO] Structure ID      0: (3, 1, 2) Space group:  82 --> 119 I-4m2
[2025-06-16 10:04:45,694][gen_pyxtal][WARNING] Compoisition [6 6 2] not compatible with symmetry 57:     spg = 57 retry.
[2025-06-16 10:04:45,749][gen_pyxtal][INFO] Structure ID      1: (1, 8, 5) Space group:  71 -->  71 Immm
[2025-06-16 10:04:45,857][gen_pyxtal][INFO] Structure ID      2: (3, 7, 8) Space group: 174 --> 174 P-6
...
cryspy.statを見ると,EAでは現在の世代の情報が追加されている.
[status]
generation = 1
id_queueing = 0 1 2 3 4 5 6 7 8 9 10 11 12 13 14 15 16 17 18 19
構造最適化
何度かcryspyを実行して,第一世代の構造最適化を終わらせると,下記のように出力される.
...
[2025-06-16 10:25:56,962][ctrl_job][INFO] Done generation 1
[2025-06-16 10:25:56,962][ctrl_job][INFO] Calculate convex hull for generation 1
[2025-06-16 10:25:57,854][ctrl_job][INFO]
EA is ready
凸包
この時点で,./data/convex_hull/にhull distanceの情報とconvex hullのグラフが出力されている.
    ID    hull distance (eV/atom)    Num_atom
     7                   0.000000    (0, 2, 6)
    14                   0.036510    (1, 7, 6)
    17                   0.064702    (0, 1, 5)
    19                   0.113649    (0, 0, 8)
    16                   0.168530    (6, 4, 8)
     9                   0.186497    (8, 4, 6)
     1                   0.187379    (1, 8, 5)
    11                   0.233893    (4, 5, 4)
     3                   0.273365    (6, 5, 5)
    10                   0.326759    (1, 4, 4)
     2                   0.330749    (3, 7, 8)
     8                   0.359543    (6, 2, 7)
     4                   0.404169    (4, 4, 2)
    18                   0.422989    (0, 6, 8)
    13                   0.428456    (0, 6, 3)
     5                   0.444792    (7, 4, 7)
     6                   0.464305    (7, 7, 7)
    12                   0.556654    (3, 0, 0)
    15                   0.560062    (6, 7, 1)
     0                   0.644278    (3, 1, 2)
- conv_hull_gen_1.svg

次世代生成
準備ができた状態でもう一度cryspyを実行すると,バックアップが実行されてから,次世代構造の生成が始まる.
...
[2025-06-16 10:37:19,860][ctrl_job][INFO] Done generation 1
[2025-06-16 10:37:20,136][utility][INFO] Backup data
[2025-06-16 10:37:20,173][ea_next_gen][INFO] # ---------- Evolutionary algorithm
[2025-06-16 10:37:20,174][ea_next_gen][INFO] Generation 2
[2025-06-16 10:37:20,174][ea_next_gen][INFO] # ------ natural selection
[2025-06-16 10:37:20,177][ea_next_gen][INFO] ranking without duplication (including elite):
[2025-06-16 10:37:20,177][ea_next_gen][INFO] Structure ID      7, fitness:    0.00000
[2025-06-16 10:37:20,177][ea_next_gen][INFO] Structure ID     14, fitness:    0.03651
[2025-06-16 10:37:20,177][ea_next_gen][INFO] Structure ID     17, fitness:    0.06470
[2025-06-16 10:37:20,177][ea_next_gen][INFO] Structure ID     19, fitness:    0.11365
[2025-06-16 10:37:20,177][ea_next_gen][INFO] Structure ID     16, fitness:    0.16853
[2025-06-16 10:37:20,177][ea_next_gen][INFO] Structure ID      9, fitness:    0.18650
[2025-06-16 10:37:20,177][ea_next_gen][INFO] Structure ID      1, fitness:    0.18738
[2025-06-16 10:37:20,177][ea_next_gen][INFO] Structure ID     11, fitness:    0.23389
[2025-06-16 10:37:20,177][ea_next_gen][INFO] Structure ID      3, fitness:    0.27336
[2025-06-16 10:37:20,177][ea_next_gen][INFO] Structure ID     10, fitness:    0.32676
[2025-06-16 10:37:20,177][ea_next_gen][INFO] # ------ Generate children
[2025-06-16 10:37:20,177][ea_child][INFO] # -- mindist
[2025-06-16 10:37:20,179][struc_util][INFO] Cu - Cu: 1.32
[2025-06-16 10:37:20,179][struc_util][INFO] Cu - Ag: 1.385
[2025-06-16 10:37:20,179][struc_util][INFO] Cu - Au: 1.34
[2025-06-16 10:37:20,179][struc_util][INFO] Ag - Ag: 1.45
[2025-06-16 10:37:20,179][struc_util][INFO] Ag - Au: 1.405
[2025-06-16 10:37:20,179][struc_util][INFO] Au - Au: 1.36
[2025-06-16 10:37:20,217][crossover][INFO] Structure ID     20 (0, 4, 7) was generated from     19 and     14 by crossover. Space group:   1 P1
[2025-06-16 10:37:20,219][crossover][INFO] Structure ID     21 (0, 1, 7) was generated from      7 and     17 by crossover. Space group:   1 P1
[2025-06-16 10:37:20,221][crossover][INFO] Structure ID     22 (3, 0, 8) was generated from     16 and     19 by crossover. Space group:   1 P1
[2025-06-16 10:37:20,225][crossover][INFO] Structure ID     23 (0, 1, 7) was generated from      7 and     17 by crossover. Space group:   1 P1
...
[2025-06-16 10:37:20,809][ea_next_gen][INFO] # ------ Select elites
[2025-06-16 10:37:20,809][ea_next_gen][INFO] Structure ID      7 keeps as the elite
[2025-06-16 10:37:20,809][ea_next_gen][INFO] Structure ID     14 keeps as the elite
あとはcryspyの実行を繰り返せば,探索が進む.
結果の確認
ここでは,EAと異なるところを中心に述べる.
cryspy_rslt
以下は第3世代まで計算を終えたcryspy_rsltの例である.EA-vcでは,形成エネルギー(Ef_eV_atom)と原子数(Num_atom)も追加される.
    Gen  Spg_num Spg_sym  Spg_num_opt Spg_sym_opt  E_eV_atom  Ef_eV_atom   Num_atom  Magmom      Opt
0     1      119   I-4m2          119       I-4m2   0.639865    0.639865  (3, 1, 2)     NaN  no_file
1     1       71    Immm           71        Immm   0.182650    0.182650  (1, 8, 5)     NaN  no_file
2     1      174     P-6          187       P-6m2   0.324864    0.324864  (3, 7, 8)     NaN  no_file
3     1       71    Immm           71        Immm   0.269227    0.269227  (6, 5, 5)     NaN  no_file
4     1       12    C2/m           65        Cmmm   0.401521    0.401521  (4, 4, 2)     NaN  no_file
7     1      123  P4/mmm          123      P4/mmm  -0.009930   -0.009930  (0, 2, 6)     NaN  no_file
10    1      107    I4mm          107        I4mm   0.320875    0.320875  (1, 4, 4)     NaN  no_file
5     1      121   I-42m          121       I-42m   0.439643    0.439643  (7, 4, 7)     NaN  no_file
6     1      115   P-4m2          115       P-4m2   0.459892    0.459892  (7, 7, 7)     NaN  no_file
8     1       81     P-4           81         P-4   0.354247    0.354247  (6, 2, 7)     NaN  no_file
9     1       11  P2_1/m           11      P2_1/m   0.182084    0.182084  (8, 4, 6)     NaN  no_file
11    1       10    P2/m           10        P2/m   0.229819    0.229819  (4, 5, 4)     NaN  no_file
nat_data
原子数の情報はnat_dataにも出力される.
    ID    ('Cu', 'Ag', 'Au')
     0    (3, 1, 2)
     1    (1, 8, 5)
     2    (3, 7, 8)
     3    (6, 5, 5)
     4    (4, 4, 2)
     5    (7, 4, 7)
     6    (7, 7, 7)
     7    (0, 2, 6)
     8    (6, 2, 7)
     9    (8, 4, 6)
    10    (1, 4, 4)
...
hull_dist_all_gen_x
例えば第3世代終了時点のhull distanceのデータは./convex_hull/hull_dist_all_gen_3というファイルに出力される.
    ID    hull distance (eV/atom)    Num_atom
    43                   0.000000    (0, 2, 5)
    42                   0.000000    (0, 5, 5)
    48                   0.000000    (0, 1, 5)
    46                   0.000009    (0, 1, 5)
    28                   0.000011    (0, 1, 5)
    41                   0.000360    (0, 4, 6)
    47                   0.001838    (0, 1, 5)
    36                   0.001992    (1, 1, 6)
    21                   0.002544    (0, 1, 7)
    23                   0.002551    (0, 1, 7)
    24                   0.002795    (0, 4, 7)
conv_hull_gen_x.svg
例えば第3世代終了時点の凸包プロットの画像データは./convex_hull/conv_hull_gen_3.svgに出力される.
デフォルトはsvg形式であるが,入力ファイルでfig_formatを変更していればpdfやpngで出力される.

解析と可視化
凸包の自動プロット
EA-vcでは2元系および3元系の探索シミュレーションの場合,凸包のグラフは各世代の計算終了時に自動プロットされる.
自分でもっと編集したい場合はJupyterでカスタマイズできる.
4元系の時はJupyterを用いたplotly(pymatgenに必要なのでインストールされているはず)の可視化が利用可能.
ここではいくつか例を示しておく.
2元系

上図は3世代まで探索した時の例で,赤文字は説明のために追加した.
凸包プロットに関する入力ファイルの設定は以下が関係する.括弧内はデフォルト値.
show_max:y軸上限(0.2)label_stable:安定相の組成を表示するかどうか(True)vmax:右のカラーバーの最大値(0.2)bottom_margin:最小値とy軸下限の間のマージン(0.02).fig_format:図のファイルフォーマット.svg, png, pdfに対応.(svg)
マーカー上の十字の印は最新世代の探索結果を示している.
3元系

上図は3世代まで探索した時の例で,赤文字は説明のために追加した.
凸包プロットに関する入力ファイルの設定は以下が関係する.括弧内はデフォルト値.
show_max:hull distanceがshow_max以下のものだけをプロット(0.2)label_stable:安定相の組成を表示するかどうか(True)vmax:右のカラーバーの最大値(0.2)bottom_margin:3元系では無関係fig_format:図のファイルフォーマット.svg, png, pdfに対応.(svg)
マーカーの十字の印は最新世代の探索結果を示している.
データのダウンロード
ここでは,CrySPYのデータをローカルPCで解析・可視化することを前提としている.
CrySPYをスーパーコンピュータやワークステーションで使用している場合は,データをローカルPCにダウンロードすること.
work や backup ディレクトリは,ファイルサイズが非常に大きくなる可能性があるため,不要であれば削除してよい.
Jupyter notebook
先ほどダウンロードした結果の中にある data/ ディレクトリに移動する.
その後,CrySPY utilityがローカルにダウンロード してある場合は cryspy_analyzer_EA-vc.ipynb をコピーする.
またはGitHubから直接ダウンロードしてくる(CrySPY_utility/notebook/).
Jupyter notebookファイルには,CrySPYのコードと同じ関数が書かれており,自由に凸包のプロットをカスタマイズできる.
適宜順番に実行していき,下記のどちらかを選ぶと自動プロットと同じものが得られる
- Binary system, matplotlib
- Ternary system, matplotlib
途中にある
- Interactive plot using Plotly
では,2元系,3元系および4元系において,Plotlyを用いたインタラクティブプロットができる.
プロット例はCrySPY > チュートリアル > インタラクティブモード(Jupyter Notebook) #Interactive plot using Plotlyを参考にすること.
Bayesian Optimization (BO)
BO
LAQA
May 15th, 2023
ここで利用しているファイルはCrySPY_utility/examples/qe_Si16_LAQAからダウンロードできる.
このチュートリアルでは,50個だけ初期構造を生成しているが,本来LAQAでは,もっと多くの構造を生成しておいてそこから良い候補を選択することでシミュレーションを進める.
cryspy.in
cryspy.inの例.
[basic]
algo = LAQA
calc_code = QE
tot_struc = 50
nstage = 1
njob = 10
jobcmd = qsub
jobfile = job_cryspy

[structure]
atype = Si
nat = 16
mindist_1 = 1.5

[QE]
qe_infile = pwscf.in
qe_outfile = pwscf.out
kppvol =  80

[LAQA]
nselect_laqa = 4

[option]
- LAQAでは
nstageは1にする必要がある. - [LAQA]セクションの
nselect_laqaだけ新しく設定する必要がある. nselect_laqaは一回の選択で選ばれる候補の数.
下記のようにwfやwsを指定すれば,LAQAのスコアにおける重みも変えられる.
省略した場合,デフォルトでは0.1と10.0がそれぞれ使われる.
スコアの詳細についてはSearch algorithms > LAQAを見ること.
[LAQA]
nselect_laqa = 4
wf = 0.1
ws = 10.0
calc_in/pwscf.in_1
&control
    calculation = 'vc-relax'
    pseudo_dir = '/usr/local/gbrv/all_pbe_UPF_v1.5/'
    outdir='./outdir/'
    nstep = 10
/

&system
    ibrav = 0
    nat = 16
    ntyp = 1
    ecutwfc = 40
    ecutrho = 200
    occupations = 'smearing'
    degauss = 0.01
/

&electrons
/

&ions
/

&cell
/

ATOMIC_SPECIES
  Si -1.0 si_pbe_v1.uspp.F.UPF
nstepで1回の選択で何ステップ構造最適化を進めるかをコントロールする.(VASPではNSW)
calc_in/job_cryspy
#!/bin/sh
#$ -cwd
#$ -V -S /bin/bash
####$ -V -S /bin/zsh
#$ -N Si_CrySPY_ID
#$ -pe smp 20
####$ -q ibis1.q
####$ -q ibis2.q

mpirun -np $NSLOTS pw.x -nk 4 < pwscf.in > pwscf.out

if [ -e "CRASH" ]; then
    sed -i -e '3 s/^.*$/skip/' stat_job
    exit 1
fi

sed -i -e '3 s/^.*$/done/' stat_job
Run
ヒント
自動化スクリプトも用意してある.このページの最下部参照.
cryspyと打って1回目の実行.
cryspy &
この入力ファイルではまず50構造生成されるのでlog_cryspyを見て確認する.
2023/05/13 13:02:07
CrySPY 1.1.0
Start cryspy.py
Number of MPI processes: 1

Read input file, cryspy.in
Save input data in cryspy.stat

# --------- Generate initial structures
# ------ mindist
Si - Si 1.5
Structure ID      0 was generated. Space group: 165 --> 165 P-3c1
Structure ID      1 was generated. Space group:  66 -->  66 Cccm
Structure ID      2 was generated. Space group: 146 --> 146 R3
Structure ID      3 was generated. Space group:  82 -->  82 I-4
Structure ID      4 was generated. Space group: 162 --> 162 P-31m
...
...
...
Structure ID     47 was generated. Space group:  90 -->  90 P42_12
Structure ID     48 was generated. Space group: 214 --> 214 I4_132
Structure ID     49 was generated. Space group:  23 -->  23 I222

Elapsed time for structure generation: 0:00:10.929030


# ---------- Initialize LAQA
# ---------- Selection 0
selected_id: 50 IDs
LAQAでは,はじめに全ての初期構造の最適化ジョブを実行する.
完全に最適化を終わらせるわけではなく,ここではnstep = 10にしているので,10ステップだけ実行される.
cryspyコマンドを繰り返して,初期構造全てについて10ステップの最適化を完了させる.
必要であれば,njobの値を上げておけば一度に多くのジョブがサブミットされる.
初めの最適化が全て終わると, log_cryspyの最後にLAQA is readyと表示される.
2023/05/13 13:23:31
CrySPY 1.1.0
Restart cryspy.py
Number of MPI processes: 1


# ---------- job status
ID     41: Stage 1 Done!

LAQA is ready
この状態でcryspy を実行すると,最初の選択が始まる.
2023/05/13 13:23:33
CrySPY 1.1.0
Restart cryspy.py
Number of MPI processes: 1


# ---------- job status

Backup data

# ---------- Selection 1
selected_id: 37 8 10 48
nselect_laqaで設定された構造の数だけ選択される.
cryspyをもう一度実行するとそれらのジョブ(次の10ステップ)がサブミットされる.
cryspy &
2023/05/13 13:23:36
CrySPY 1.1.0
Restart cryspy.py
Number of MPI processes: 1


# ---------- job status
ID     37: submit job, Stage 1
ID      8: submit job, Stage 1
ID     10: submit job, Stage 1
ID     48: submit job, Stage 1
あとはこれを何度も繰り返し行うことでスコアに応じて選択された構造の最適化が10ステップずつ進行する.
ある程度の構造の最適化が完全に完了するまで進めて,止めたいタイミングでストップする.
Status
シミュレーションの途中でスコアの確認がしたければ次のファイルを見ると良い:
他にもLAQAに関数ファイルがいくつか出力される:
- ./data_LAQA_bias
- ./data_LAQA_energy
- ./data_LAQA_score
- ./data_LAQA_selected_id
- ./data_LAQA_step
Analysis and visualization
ここではCrySPYのデータをローカルPCで解析する.
スパコンやワークステーションで計算を行ったら,ローカルPCにデータをダウンロードしておく.
今後必要なければ,ファイルサイズが大きいworkとbackupディレクトリは削除しておいて良い.
pklデータはgzipしておくとファイルサイズを減らすことができる.
jupyter notebook
ダウンロードした結果のdata/ディレクトリに移動して,cryspy_analyzer_LAQA.ipynbをCrySPY utilityからコピーする.
このjupyter notebookを順番に実行していけば下記のようなグラフとgif画像が作成できる.
この例では,アニメーションのために全ての構造の最適化を完全に完了させた.
(全て最適化を完了させるとランダムサーチと計算量が変わらないのでLAQAの優位性はない)
このグラフはエネルギーを最適化ステップの関数として示している.
赤い線は最終的にエネルギーが低かった3つの構造を表しており,中でも一番安定だった構造はダイアモンド構造に到達している.
安定になる構造はかなり早い段階で選択されて構造最適化が完了していることがわかる.
情報
algo = LAQAでは[option]セクションの下記の二つは自動的にTrueになる.
- force_step_flag = True
- stress_step_flag = True
原子に働く力とストレスのデータは1ステップごとに収集される.
エネルギーと構造データは1ステップごとではなく,選択ごとに収集される.
つまり,この場合は10ステップおきにエネルギーと構造データは保存される.
もし1ステップごとのデータが欲しいのであれば,手動で下記の設定を追加すること.
[option]
energy_step_flag = True
struc_step_flag = True
Auto script
何度も繰り返しcryspyを実行するのは面倒に感じたかもしれない.
下記のようなスクリプトを使えば自動化できる.
repeat_cryspy
Molecular crystal structure prediction
In this section, we give a tutorial on the molecular structure generation part only.
Since version 0.9.0, CrySPY has been able to generate random molecular crystal structures using PyXtal.
You need to use a pre-defined molecular by PyXtal’s database (see, https://pyxtal.readthedocs.io/en/latest/Usage.html?highlight=benzene#pyxtal-molecule-pyxtal-molecule))
or create molecule files that define molecular structures.
Pre-defined molecule
PyXtal currently supports C60, H2O, CH4, NH3, benzene, naphthalene, anthracene, tetracene, pentacene, coumarin, resorcinol, benzamide, aspirin, ddt, lindane, glycine, glucose, and ROY.
Let us generate molecular crystal structures that consist of 2 benzenes.
Move to your working directory, and copy input example files by one of the following methods.
Take a look at cryspy.in.
$ cat cryspy.in
[basic]
algo = RS
calc_code = QE
tot_struc = 6
nstage = 2
njob = 2
jobcmd = qsub
jobfile = job_cryspy

[structure]
struc_mode = mol
atype = H C
nat = 12 12
mol_file = benzene
nmol = 2

[QE]
qe_infile = pwscf.in
qe_outfile = pwscf.out
kppvol = 40  60

[option]
In generating molecular crystal structures, you have to set struc_mode = mol in the [structure] section.
Molecule file(s) and the number of molecule(s) are specified as:
- mol_file = benzene
- nmol = 2
Run CrySPY and see the initial structures (./data/init_POSCARS).
User-defined molecule
Move to your working directory, and copy input example files for 2 formula units of Li3PS4.
- version 1.0.0 or later
- version 0.10.3 or earlier
cp -r ~/CrySPY_root/CrySPY-0.9.0/example/QE_Li3PS4_2fu_RS_mol .
$ cd QE_Li3PS4_2fu_RS_mol
$ ls
Li.xyz  PS4.xyz  calc_in/  cryspy.in
Molecule files of Li and PS4 are included. Supported formats in PyXtal are .xyz, .gjf, .g03, .g09, .com, .inp, .out, and pymatgen’s JSON serialized molecules.
$ cat Li.xyz
1
New structure
 Li  0.000  0.000  0.000
$ cat PS4.xyz
5
New structure
 P    0.000000    0.000000    0.000000
 S    1.200000    1.200000   -1.200000
 S    1.200000   -1.200000    1.200000
 S   -1.200000    1.200000    1.200000
 S   -1.200000   -1.200000   -1.200000
Check cryspy.in.
$ cat cryspy.in
[basic]
algo = RS
calc_code = QE
tot_struc = 4
nstage = 2
njob = 1
jobcmd = qsub
jobfile = job_cryspy

[structure]
struc_mode = mol
atype = Li P S
nat = 6 2 8
mol_file = ./Li.xyz  ./PS4.xyz
nmol = 6 2

[QE]
qe_infile = pwscf.in
qe_outfile = pwscf.out
kppvol = 40  60

[option]
A single atom (Li atom in this case) is treated as a molecule in the molecular crystal structure generation mode.
In this example, a random molecular structure is composed of six Li molecules (atoms) and two PS4 molecules specified as:
- mol_file = ./Li.xyz ./PS4.xyz
- nmol = 6 2
In mol_file, set relative path of molecule files from cryspy.in.
Here the molecule files are placed in the same directory.
Run CrySPY and see the initial structures (./data/init_POSCARS).
timeout_mol
Molecular crystal structure generation can be time consuming because PyXtal calculates the molecule directions according to a specified space group.
Sometimes molecular crystal structure generation gets stuck.
So we set a time limit on the single structure generation.
The time limit (timeout_mol) is set to 120 seconds by default.
If the limit is insufficient, you have to increase it as (see last line):
struc_mode = mol
atype = Li P S
nat = 6 2 8
mol_file = ./Li.xyz  ./PS4.xyz
nmol = 6 2
timeout_mol = 300.0
Volume of unit cell
You can control the volume of unit cells by changing the value(s) of scaling factor, vol_factor, in cryspy.in.
By default, vol_factor is set to 1.0.
It is also possible to specify a range of factors.
Set minimum and maximum values as follows:
struc_mode = mol
atype = Li P S
nat = 6 2 8
mol_file = ./Li.xyz  ./PS4.xyz
nmol = 6 2
timeout_mol = 300.0
vol_factor = 0.8 1.5
Random structure generation with MPI
2023/10/21 update
情報
動作環境:
- CrySPY
1.1.0 1.2.3 or later - mpi4py
- MPI library (Open MPI, Intel MPI, MPICH, etc.)
警告
1.1.0 <= CrySPY <=1.2.2ではバグがあった.
MPIを使ったジョブをbashやzshで実行するとき(e.g., jobcmd = zsh, jobfile = job_cryspy),MPIのジョブが流れない.
qsubやsbatchでジョブスケジューラーを使う場合は問題ない。
このバグはバージョン1.2.3で修正.
mpi4py
mpi4pyのインストールがまだであればインストールする.
入力ファイル
cryspy.inはいつもと同じで変更する必要はない.ここでは下記の設定でMPIを使った構造生成を行う.
[basic]
algo = RS
calc_code = soiap
tot_struc = 100
nstage = 1
njob = 2
jobcmd = zsh
jobfile = job_cryspy

[structure]
atype = Si
nat = 8

[soiap]
soiap_infile = soiap.in
soiap_outfile = soiap.out
soiap_cif = initial.cif

[option]
tot_struc,atype,nat以外の変数は構造生成に関係がないのでここでは無視して良い.
実行
4並列で実行する場合,mpiexec -nを使う.-pオプションも必要.
In 1.1.0 <= CrySPY <= 1.2.2では下記のコマンド (-pオプションは使用しない)
ジョブスケジューラーなどにサブミットするときは自分でジョブファイルを作る.下記は一例.
#!/bin/sh
#$ -cwd
#$ -V -S /bin/bash
#$ -N n_nproc
#$ -pe smp 4

mpirun -np $NSLOTS ~/.local/bin/cryspy
実行スクリプトcryspyのpathなどは適宜編集すること.
結果
CrySPYはシンプルに構造生成タスクをプロセス数で分割している.
- Rank 0: IDs 0 – 24
- Rank 1: IDs 25 – 49
- Rank 2: IDs 50 – 74
- Rank 3: IDs 75 – 99
構造が生成された順番でログが出力される.
2023/04/24 22:47:51
CrySPY 1.1.0
Start cryspy.py
Number of MPI processes: 4

Read input file, cryspy.in
Save input data in cryspy.stat

# --------- Generate initial structures
# ------ mindist
Si - Si 1.11
Structure ID     25 was generated. Space group: 138 --> 123 P4/mmm
Structure ID     75 was generated. Space group:  99 -->  99 P4mm
Structure ID      0 was generated. Space group: 127 --> 123 P4/mmm
Structure ID      1 was generated. Space group:  61 -->  61 Pbca
Structure ID     50 was generated. Space group:  38 -->  38 Amm2
Structure ID     51 was generated. Space group: 134 --> 123 P4/mmm
Structure ID     26 was generated. Space group: 111 --> 123 P4/mmm
Structure ID      2 was generated. Space group:   9 -->   9 Cc
Structure ID      3 was generated. Space group:  80 -->  80 I4_1
Structure ID      4 was generated. Space group: 107 --> 107 I4mm
Structure ID      5 was generated. Space group:  75 -->  75 P4
Structure ID     76 was generated. Space group: 108 --> 108 I4cm
Structure ID     77 was generated. Space group: 100 --> 100 P4bm
Structure ID     27 was generated. Space group: 207 --> 221 Pm-3m
しかし,init_POSCARSでは,構造生成が全て終わった後に出力しているのでID順になっている.
ID_0
1.0
   2.9636956737951818    0.0000000000000002    0.0000000000000002
   0.0000000000000000    2.9636956737951818    0.0000000000000002
   0.0000000000000000    0.0000000000000000    6.2634106638053080
Si
8
direct
  -0.1602734164607877   -0.1602734164607877   -0.0000000000000000 Si
   0.1602734164607877    0.1602734164607877    0.5000000000000000 Si
   0.6602734164607877    0.3397265835392123    0.7500000000000000 Si
   0.3397265835392122    0.6602734164607877    0.2500000000000000 Si
   0.4469739273741755    0.4469739273741755   -0.0000000000000000 Si
   0.5530260726258245    0.5530260726258244    0.5000000000000000 Si
   0.0530260726258245    0.9469739273741754    0.7500000000000000 Si
   0.9469739273741754    0.0530260726258245    0.2500000000000000 Si
ID_1
1.0
   7.2751506682509657    0.0000000000000004    0.0000000000000004
   0.0000000000000000    7.2751506682509657    0.0000000000000004
   0.0000000000000000    0.0000000000000000    5.1777634169924873
Si
8
direct
  -0.3845341807505553   -0.3845341807505553    0.4999999999999999 Si
   0.3845341807505553    0.3845341807505553    0.5000000000000000 Si
   0.3845341807505553   -0.3845341807505553    0.0000000000000000 Si
  -0.3845341807505553    0.3845341807505553   -0.0000000000000000 Si
   0.0000000000000000    0.5000000000000000    0.2500000000000000 Si
   0.5000000000000000    0.0000000000000000    0.7500000000000000 Si
   0.0000000000000000    0.5000000000000000    0.7500000000000000 Si
   0.5000000000000000    0.0000000000000000    0.2500000000000000 Si
ID_2
1.0
  -4.3660398676292269   -4.3660398676292269    0.0000000000000000
  -4.3660398676292269   -0.0000000000000003   -4.3660398676292269
   0.0000000000000000   -4.3660398676292269   -4.3660398676292269
Si
8
direct
   0.8700001548800920    0.8700001548800920    0.1299998451199080 Si
   0.1299998451199080    0.1299998451199080    0.8700001548800920 Si
   0.8700001548800920    0.1299998451199080    0.8700001548800920 Si
   0.1299998451199080    0.8700001548800920    0.1299998451199080 Si
   0.1299998451199080    0.8700001548800920    0.8700001548800920 Si
   0.8700001548800920    0.1299998451199080    0.1299998451199080 Si
   0.7500000000000000    0.7500000000000000    0.7500000000000000 Si
   0.2500000000000000    0.2500000000000000    0.2500000000000000 Si
メモ
ランダム構造生成以外の部分はMPIを使っても並列化されていないので意味はない.
インタラクティブモード (Jupyter Notebook)
2025年3月6日
情報
動作環境:
- CrySPY 1.4.0以上
- Jupyter
- ASE対応の構造最適化計算ソフト(汎用機械学習ポテンシャルなど)
- nglview (optional)
準備
CrySPYをインストールすればASEは自動的にインストールされている.
ワークステーションやローカルPCでJupyterを使えるようにしておく.
このチュートリアルでは,構造最適化にPure Python EMT calculatorを用いる.このEMTポテンシャルの精度は悪く,デモ用のものなので注意.
exampleのノートブックには汎用機械学習ポテンシャルのCHGNetを使用するコードも書いてあるので,CHGNetを試したい場合は事前にpipでインストールしておく.
入力ファイル
どこか適当なワーキングディレクトリに移動して,まずはexampleをコピーしてくる.下記のどちらからコピー
してきても良い.
インタラクティブモードでも,cryspy.inを入力ファイルとして使用する.
インタラクティブモードではcalc_inディレクトリは使用しない.
input_examplesディレクトリの中に,いくつかの入力ファイル例が入っているので参考にしてほしい.
ここではEA-vcを用いた下記のcryspy.inを使用する.EA-vcについてはEA-vcのチュートリアルを見ること.
[basic]
algo = EA-vc
calc_code = ASE
nstage = 1
njob = 10
jobcmd = zsh
jobfile = job_cryspy

[structure]
atype = Cu Au
ll_nat = 0 0
ul_nat = 8 8

[ASE]
ase_python = ase_in.py

[EA]
n_pop = 20
n_crsov = 5
n_perm = 2
n_strain = 2
n_rand = 2
n_add = 3
n_elim = 3
n_subs = 3
target = random
n_elite = 2
n_fittest = 10
slct_func = TNM
t_size = 2
maxgen_ea = 5
end_point = 0.0 0.0

[option]
ノートブック
cryspy_interactive.ipynbを開いて,上から実行していく.
Check current working directory
最初のセルはファイルやcryspy.inの中身を確認しているだけ.
!pwd
print()
!ls
print()
!cat cryspy.in
Import
コメントアウトされているものは今回は無視して,CrySPYのインタラクティブモードで核となるライブラリをインポートするセルを実行する.
# ---------- import
from cryspy.interactive import action
Initialize CrySPY
このセルは通常の初回実行に対応している.cryspy.inを読み込んで初期構造が生成される.
# ---------- initial structure generation
action.initialize()
Set calculator
このセルでASEのcalculatorをセットする.ここではASEのEMTを用いる.
# ---------- EMT in ASE
from ase.calculators.emt import EMT
calculator = EMT()

# ---------- CHGNet
#from chgnet.model import CHGNetCalculator
#calculator = CHGNetCalculator()
Restart CrySPY
このセルを実行すると,先ほど生成した初期構造の最適化が始まる.
インタラクティブモードでは一つ一つ順番に構造最適化計算を行う.その際に進捗バーも表示される.
# ---------- structure optimization
action.restart(
    njob=20,    # njob=0: njob in cryspy.in will be used
    calculator=calculator,
    optimizer='BFGS',    # 'FIRE', 'BFGS' or 'LBFGS'
    symmetry=True,       # default: True
    fmax=0.01,           # default: 0.01 eV/Å
    steps=2000,          # default: 2000
)
- njob: 一度の実行で最適化計算を行う構造数.0の場合は
cryspy.inに書いてある値が使用される. - calculator: 先に設定したcalculatorを代入
- optimizer:
FIRE, BFGS, LBFGSから選択.文字列で指定する. - symmetry: Trueなら対称性を維持した構造最適化を行う
- fmax: 収束判定に使われる原子に働く力の最大値(eV/Å)
- steps: 最大最適化ステップ数
njobの値を小さくしている場合は,何度かこのセルを実行して,全ての初期構造の最適化を終了させる.
EA-vcを用いている場合,すべて終わると以下のように表示される.
もう一度このセルを実行すると世代交代が行われるので,次世代の構造生成が終了したら,あとは同様にこのセルの実行を繰り返す.
Show results
このセルを実行すると,cryspy_rslt_energy_ascなどのファイルを表示できる.
# ---------- show results
#!cat ./data/cryspy_rslt    # Order of structure optimization completion
!cat ./data/cryspy_rslt_energy_asc    # show energy ascending order
#!sed -n 2,4p ./data/cryspy_rslt    # show i--jth lines
#!tail -n 5 ./data/cryspy_rslt    # show last 5 lines
Structure visualization
初期構造や最適化済みの構造をインタラクティブに可視化できる.
from ase.visualize import view
atoms = action.get_atoms('opt', cid=0)    # 'init' or 'opt'
view(atoms, viewer='ngl')    # viewer = 'ngl', 'ase', or 'x3d'
action.get_atoms('opt', cid=0)のところでoptをinitに変えると,初期構造が確認できる.
cidで構造IDを指定する.
ASEの機能を使用しているのでviewerにはngl, ase, x3dが利用できる.
nglを使うにはnglviewのインストールが必要なのでpipでインストールしておく.

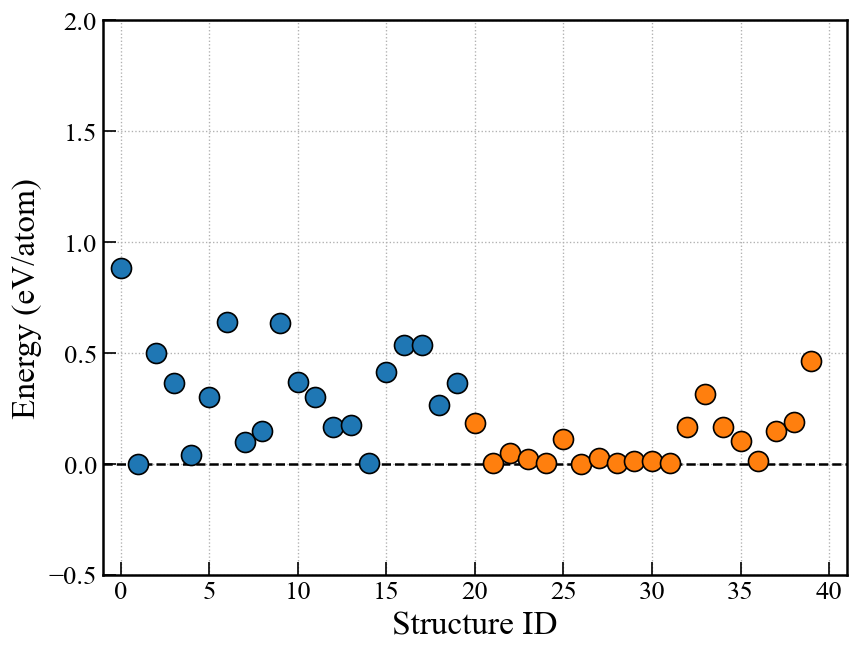
Energy plot for RS, EA
ランダムサーチ(RS)や進化的アルゴリズム(EA)の場合,下記画像のようなエネルギーグラフを表示できる.
EA-vcの場合は原子数が異なるので単純にエネルギーを比較できないので,後述のconvex hullプロットを使う.
fig, ax = action.plot_E(
              title=None,
              ymax=2.0,
              ymin=-0.5,
              markersize=12,
              marker_edge_width=1.0,
              marker_edge_color='black',
              alpha=1.0,
          )
Convex hull plot for EA-vc
Interactive plot using Plotly
EA-vcの場合はPlotlyを用いたconvex hullのインタラクティブプロットが利用できる.
CrySPYをインストールすればPlotlyは自動的にインストールされている.
このconvex hullプロットはpymatgenの機能を用いている.
action.interactive_plot_convex_hull(cgen=None, show_unstable=0.2, ternary_style='2d')
- cgen: どの世代までプロットするかを指定.Noneであれば最新の世代までプロットされる.
- show_unstable: 描画するhull distanceの最大値.
- ternary_style
- 2元系: ternary_style = ‘2d’
- 3元系: ternary_style = ‘2d’, ‘3d’
- 4元系: ternary_style = ‘3d’
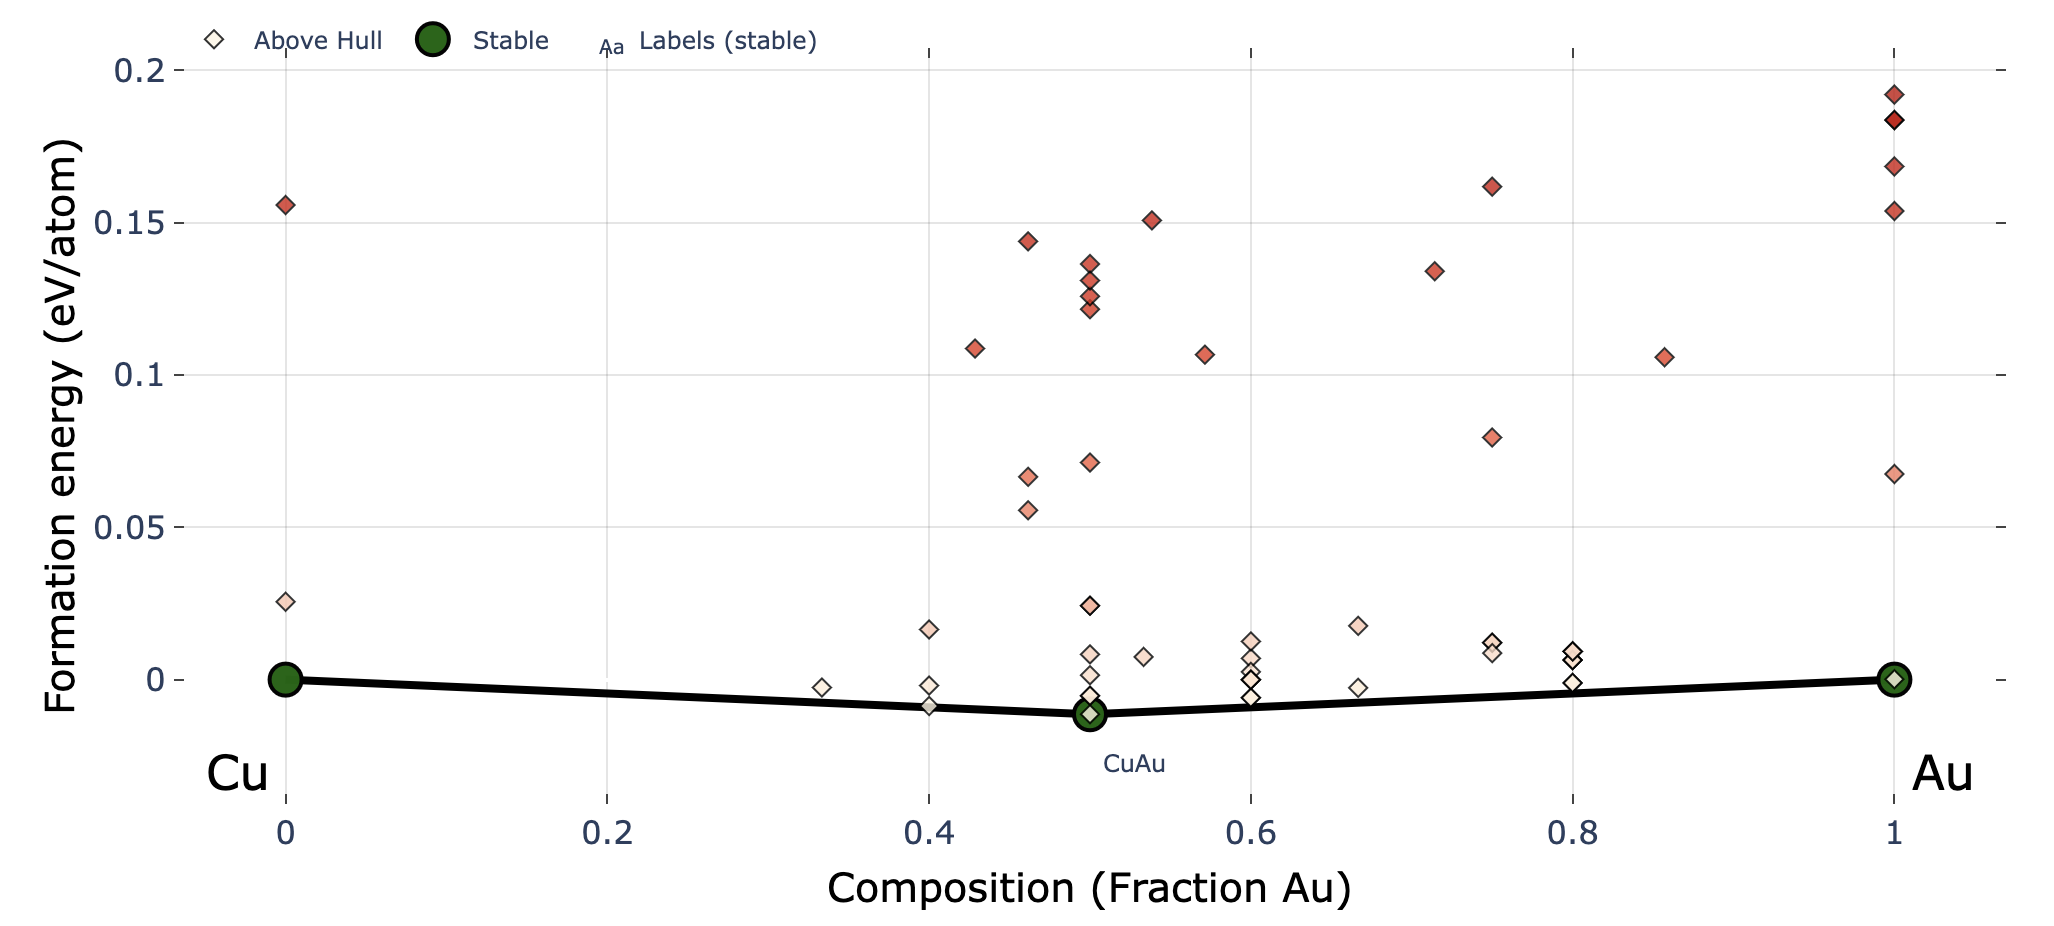
2元系ではなく,3元系や4元系で計算しているときは下記のようなインタラクティブプロットが得られる.
左から順に,3元系(ternary_style = ‘2d’),3元系(ternary_style = ‘3d’),4元系(ternary_style = ‘3d’)のプロット
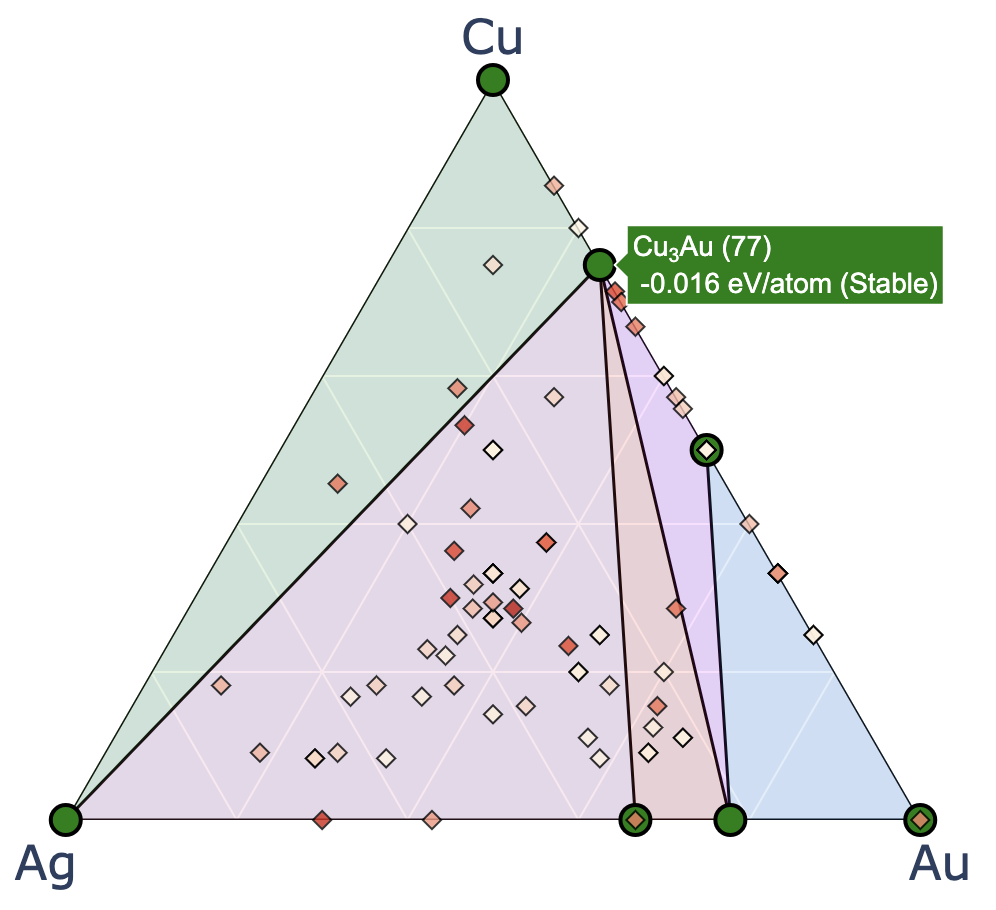
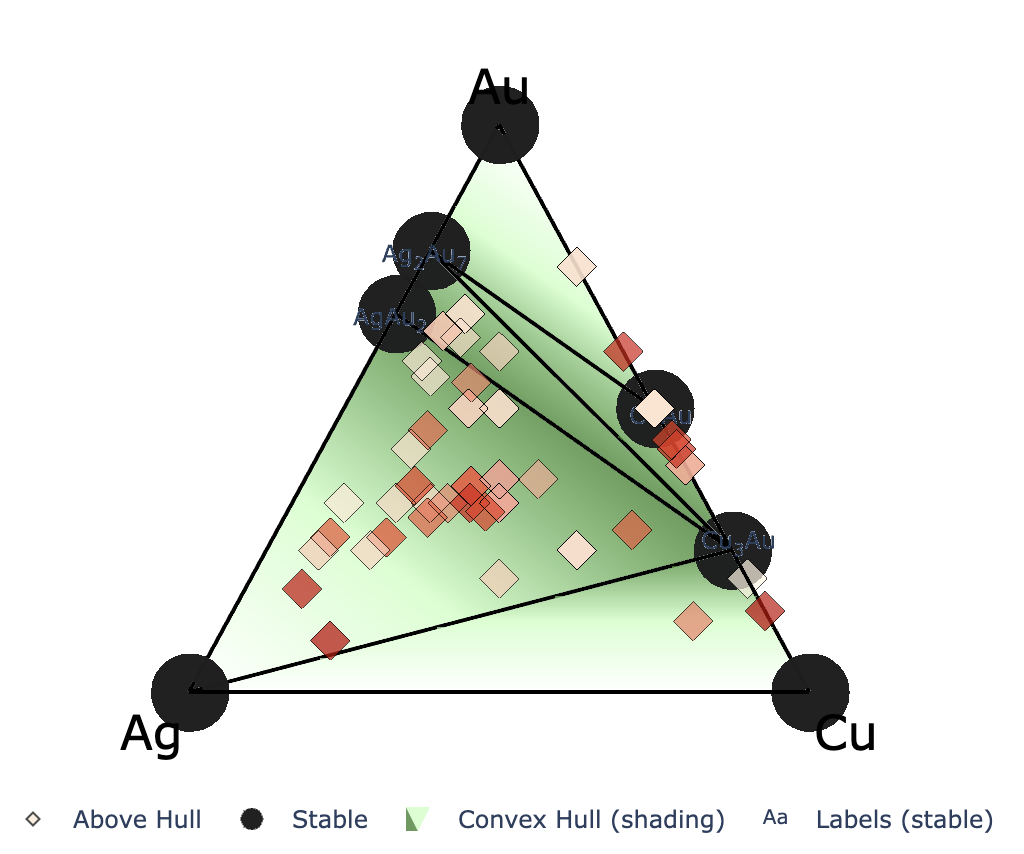
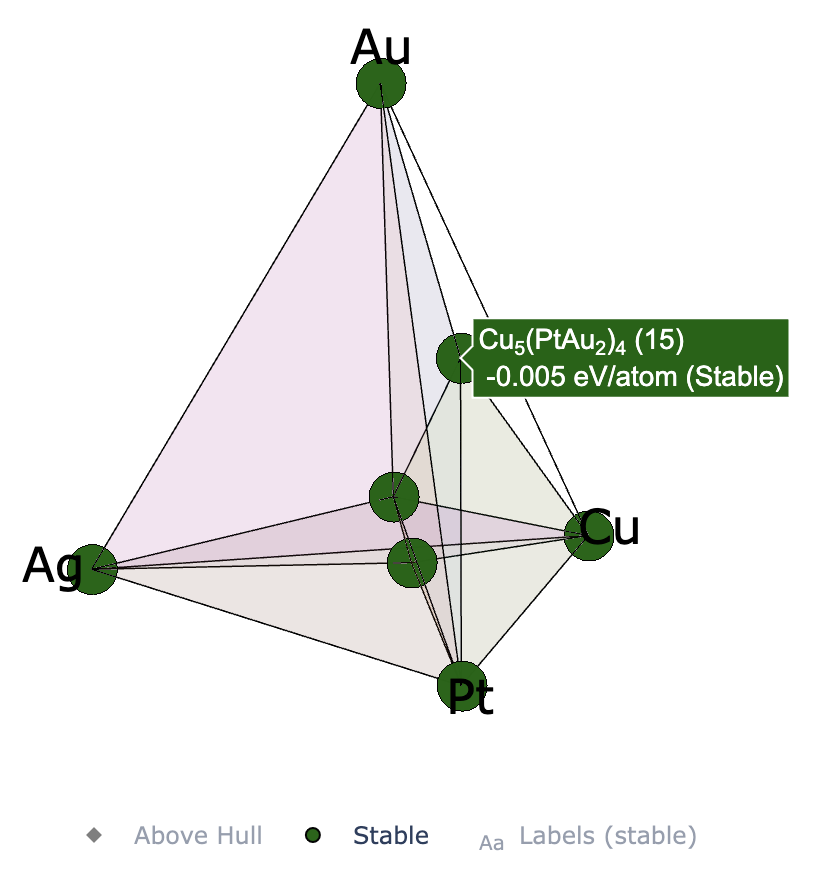
Binary system using matplotlib
このセルを実行すると,matplotlibを用いて2元系のconvex hullをプロットできる.
fig, ax = action.plot_convex_hull_binary(
              cgen=None,
              show_max=0.2,
              label_stable=True,
              vmax=0.2,
              bottom_margin=0.02,
          )
fig    # to show plot in jupyter
- cgen: どの世代までプロットするかを指定.Noneであれば最新の世代までプロットされる.
- show_max: 描画するhull distanceの最大値.
- label_stable: 安定相のラベルを表示するかどうか.
- vmax: カラーバーのhull distaceの最大値.
- bottom_margin: y軸の下部のマージン.
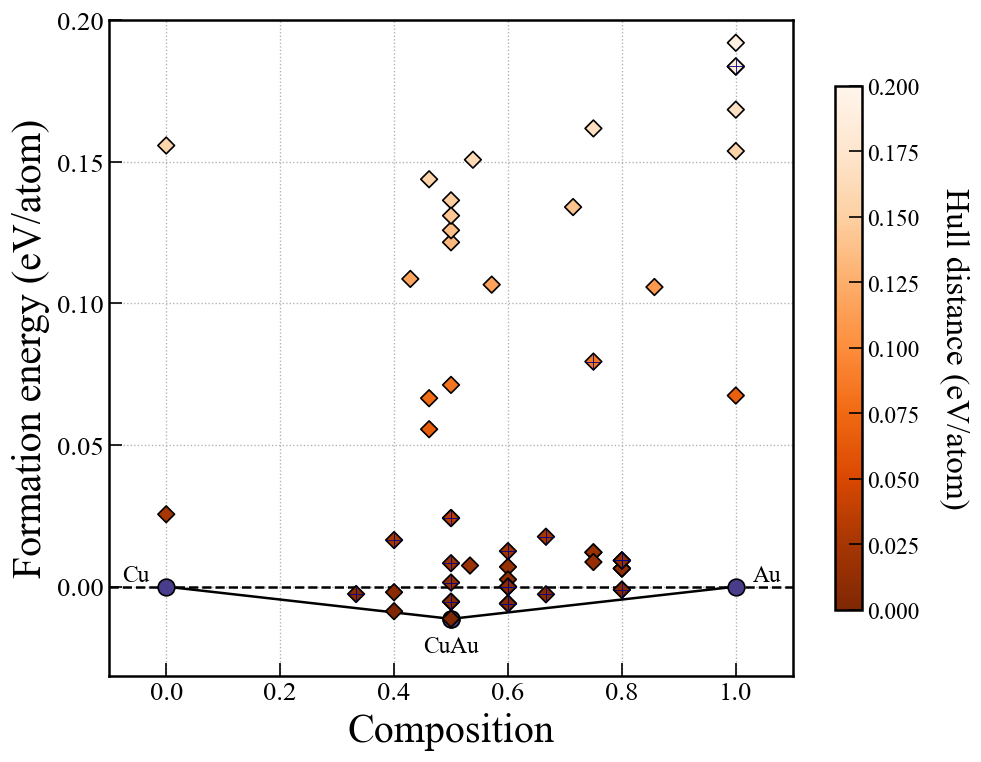
Ternary system using matplotlib
もし3元系の探索をしている場合は,このセルを実行することでmatplotlibを使ったconvex hullのプロットができる.
fig, ax = action.plot_convex_hull_ternary(
              cgen=None,
              show_max=0.2,
              label_stable=True,
              vmax=0.2,
          )
fig    # to show plot in jupyter
- cgen: どの世代までプロットするかを指定.Noneであれば最新の世代までプロットされる.
- show_max: 描画するhull distanceの最大値.
- label_stable: 安定相のラベルを表示するかどうか.
- vmax: カラーバーのhull distaceの最大値.
例えば以下のようなプロットが得られる.
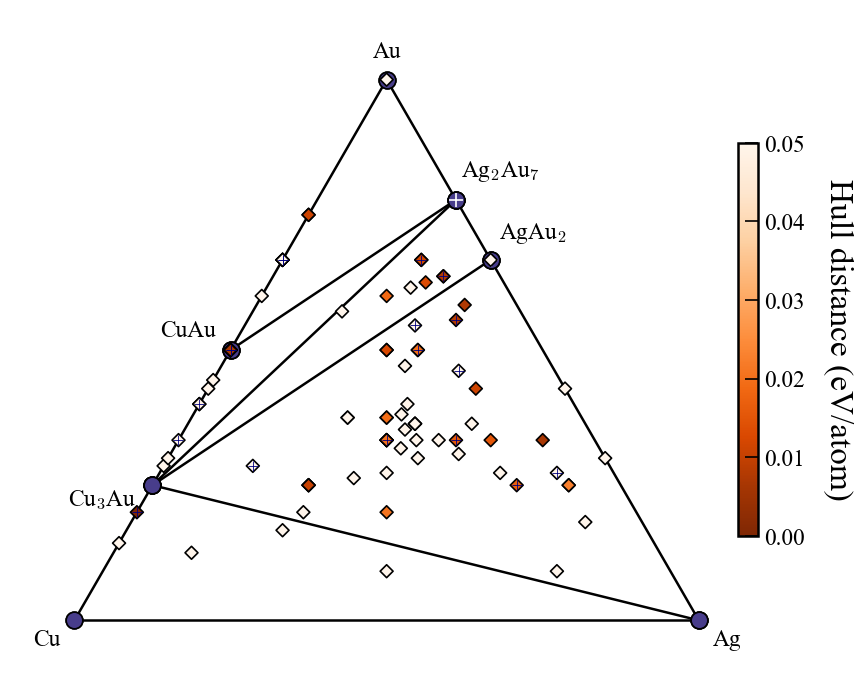
探索アルゴリズムのサブセクション
Random search (RS)
under construction
進化的アルゴリズム (EA)
2025 April 2
背景
進化的アルゴリズム(EA)は,進化論に着想を得たメタヒューリスティックな手法である.
EA は,これまでに探索された安定構造(親構造)の局所環境を受け継ぐことで,新たな構造(子個体)を効果的に生成することができる.
Oganov グループの USPEX はよく知られたソフトウェアであり,そのほかにも XtalOpt などがある.
先行研究の例は以下の通り.
- T. S. Bush, C. R. A. Catlow, and P. D. Battle, J. Mater. Chem. 5, 1269 (1995).
- A. R. Oganov and C. W. Glass, J. Chem. Phys. 124, 244704 (2006).
- A. R. Oganov, A. O. Lyakhov, and M. Valle, Acc. Chem. Res. 44, 227 (2011).
- A. O. Lyakhov, A. R. Oganov, H. T. Stokes, and Q. Zhu, Comput. Phys. Commun. 184, 1172 (2013).

手順
- 個体群(population)の初期化
- 適応度(fitness)の評価
- 自然選択
- 親個体の選択
- 次世代の生成
- ステップ2(適応度の評価)に戻り繰り返す
個体群(population)の初期化
第一世代では,n_pop で指定された数のランダム構造が生成される.
EAおよびEA-vcにおいては,tot_struc は使用されない.
適応度(fitness)の評価
現在,CrySPYにおいて適応度として使用できるのはエネルギーのみである.
fit_reverse = False に設定することで,最小値探索モードになるよう構成されている.
この fit_reverse の設定は,将来的にエネルギー以外の物性を適応度として用いる場合に備えて用意されている.
自然選択
DFT計算では,まれに失敗して極端に不合理なエネルギー値が得られることがある.
emax_ea および emin_ea を用いることで,極端に高い(または低い)エネルギーを持つ構造を除外することができる:
$$ \mathrm{emin\_ea} \le E \ (\mathrm{eV/atom}) \le \mathrm{emax\_ea} $$
たとえば,emin_ea を設定すると,その値よりも低いエネルギーを持つ構造は無視される.
自然選択では,まず現在の個体群と,過去の世代から保持されたエリート個体が,適応度に基づいてランク付けされる.
ここで使用されるエリート個体の数は,n_eliteで指定される.
現在の個体群とエリート個体の中から,適応度の高い順に n_fittestの数の個体が選択され,それ以外は淘汰される.
自然選択の過程では,pymatgen のStructureMatcher クラスにより重複を除去し,上位n_fittestの数の個体を選択している.
n_fittest は,n_pop(個体群サイズ)の約半分に設定されることが多い.
現在の実装では,n_fittest = 0 の場合,すべての個体が保持される仕様になっている.
下の図はn_fittest = 5の場合の自然選択の例を示している.

親個体の選択
親候補の個体の中から1つの親個体を選択するために,CrySPYでは2種類の選択手法が実装されている.
いずれの手法も,適応度の高い個体がより高い確率で選ばれるように設計されている.
slct_func = TNMを設定するとトーナメント選択が,slct_func = RLTを設定するとルーレット選択が使用される.
トーナメント選択はパラメータが少なく,簡単に使用できる点が利点である.
次世代の生成
次世代は,親候補の個体に対して進化的操作を適用して生成された子個体と,一部のランダム構造から構成される.
ランダム構造は,多様性を維持し,局所的最小からの脱出を促すために各世代で追加される.
進化的操作
ここでは,CrySPYに実装されている,組成固定型EAの進化的操作を紹介する.
個体群の数
crossover, permutation, strainおよびランダムに生成された構造数の合計がn_popと等しくなければならない.
n_pop = n_crsov + n_perm + n_strain + n_rand
進化的アルゴリズム (EA)のサブセクション
Crossover
概要
交叉(cross over)は,2つの親構造のスライスされた領域を交換することで,新たな構造(子個体)を生成する進化的操作である.
この操作により,構造の多様性が促進され,局所的に安定な特徴が遺伝することが可能となる.
構造探索において低エネルギー構造を効率的に探索するための主要な手法のひとつである.
手順
- 親候補から異なる個体を2つ選択
- ランダムに並進操作
- 格子ベクトルをランダムに選択
- 中央付近で親構造を切断
- 切断された半分を交換
- 原子数の多い子構造を選択
- ボーダー付近で原子数の調整
- 最小原子間距離のチェック

4. 中央付近で親構造を切断
切断ポイントは中央付近で,下記のように毎回少し変化させる.
slice_point = np.clip(np.random.normal(loc=0.5, scale=0.1), 0.3, 0.7)
以降のステップで失敗した場合,このステップ4に戻って再開する場合がある.
ただし,再開可能な回数はmaxcnt_eaで上限が決められており,それを過ぎた場合は親の選択からやり直す.
5. 切断された半分を交換
crs_latがrandomの時,子構造の格子ベクトルは2つの親構造のうちのどちらか一方をそのまま引き継ぐ.
crs_latがequalの場合は,親構造の格子ベクトルの平均を使う.
デフォルトはrandom.
6. 原子数の多い子構造を選択
親構造を入れ替えると,通常二つの原子数の異なる構造が得られる.
とりあえず,原子数の多い構造を採用する.

ただし,原子数が元の構造のものと大きく違う場合はステップ4(中央付近で親構造を切断)からやり直す.
その許容量はnat_diff_toleで決める.
デフォルト値は4で,その場合それぞれの元素において原子数の差が±4まで許容される.
上の図の場合,元の構造と比較すると,青の原子は-1で,緑の原子は+2になっている.
7. ボーダー付近で原子数の調整
削除
原子数を調整する際,まずは原子の削除から行う.
下の図に示すように,mindistで定義される最小原子間距離を満たしていない原子から優先的に削除される.

以下のように,もし原子の削除が完了しても最小原子間距離の制限にかかる原子がある場合,ステップ4(中央付近で親構造を切断)からやり直す.

最小原子間距離の制限にかかる原子が無く,さらに原子を削除する必要がある場合は,下の図に示すようにボーダーから近い原子から削除する.切断ポイントに加えて内部座標が0のところもボーダーであることに注意.

追加
原子が不足しているときは,その原子をボーダー付近に追加する.
選択されている軸に沿った内部座標は下記のように決める.
ここでmeanは切断ポイントの座標か0である.
coords[axis] = np.random.normal(loc=mean, scale=0.08)
座標の残りの二つの成分はランダムに決められる.
最小原子間距離のチェックを行いながら,元の組成と一致するまで原子を追加する.

Permutation
概要
置換(permutation)は,単一の構造内における異なる元素同士の配置を入れ替えることで,新たな構造(子個体)を生成する進化的操作である.
この操作により,格子および全体の組成を変えることなく,異なる構造配置の探索が可能となる.
手順
異なる元素の原子の位置を入れ替える.
原子の入れ替えの回数はntimesで指定する.デフォルトは1回.
入れ替え後,最小原子間距離をチェックする.

Strain
概要
歪み(strain)は,親構造の格子に対して小さなランダムな変形を加えることで,新たな構造(子個体)を生成する進化的操作である.
この操作により,原子の接続関係や組成を保持しつつ,構造空間の近傍領域を探索することが可能となる.
構造候補の微調整や,局所的な最小値からの脱出にも有効である.
手順
以下の歪み行列を用いて,格子ベクトル
$ \mathbf{a} $を変形させる.
$$
\mathbf{a}' = \begin{pmatrix}
1 + \eta_1 & \frac{1}{2} \eta_6 & \frac{1}{2} \eta_5 \\
\frac{1}{2} \eta_6 & 1 + \eta_2 & \frac{1}{2} \eta_4 \\
\frac{1}{2} \eta_5 & \frac{1}{2} \eta_4 & 1 + \eta_3
\end{pmatrix} \mathbf{a}.
$$ここで,
$ \eta_i $はガウス分布
$ \mathcal{N}\left( 0, \ \sigma_{\mathrm{st}}^2 \right) $から決まる値で,
$ \sigma_{\mathrm{st}} $は入力パラメーターsigma_stで指定できる(デフォルトはsigma_st = 0.5).
下の図に示すように,格子を変形させた後は,元の体積に戻す.
最後に最小原子間距離の制限をチェックする.

トーナメント選択
概要
トーナメント選択は,適応度に基づいて候補の中から親個体を選ぶための手法である.
この手法は,個体群内の選択圧と多様性のバランスをとるように設計されている.
下の図は,n_fittest = 10,t_size = 3の場合の例を示す.

手順
- 親個体候補から,所定の数(
t_size)の個体をランダムに選択 - その中で,最も適応度の高い(すなわち,エネルギーが最も低い)個体が親として選ばれる
- この処理を繰り返し,必要な数の親個体が選ばれるまで続ける
利点
- シンプルで効率的
- パラメータは1つだけ (
t_size) t_sizeを変えることで選択圧を調整可能
注意
t_sizeはデフォルトで3t_sizeが小さいと,多様性が促進されるt_sizeが大きいと,選択圧が増して,選択確率がより適応度に依存する- ルーレット選択とは異なり,トーナメント選択では下位の(
t_size - 1)個の個体が選択されることはない
ルーレット選択
概要
ルーレット選択は,適応度に基づいて親候補の個体の中から親個体を選ぶための確率的手法である.
ルーレット選択においては,各個体の選ばれる確率はその適応度に比例する.
手順
fit_reverse が False(デフォルト)に設定されている場合,これはエネルギーを適応度として用いる最小化モードに対応しており,親候補の適応度には –1 が掛けられる.- 適応度
$ f_i $ は,以下の式により線形スケーリングされて
$ f'_i $ に変換される.ここで,
$ a $ および
$ b $ は,それぞれ
a_rlt および b_rlt で指定されるパラメータであり,
$ a > b $ でなければならない.
$$ f_i' = \frac{a - b}{f_{\mathrm{max}} - f_{\mathrm{min}}} f_i + \frac{b f_{\mathrm{max}} - a f_{\mathrm{min}}}{f_{\mathrm{max}} - f_{\mathrm{min}}} $$ - スケーリング後の適応度
$ f'_i $ は,次式により選択確率に変換される:
$$ p_i = \frac{f_i'}{\sum_k f_k'} $$
各
$ p_i $ は,
$ i $ 番目の個体が選ばれる確率を表す. - 親個体は,
$ p_i $ に基づいてルーレット選択により1つずつ選ばれ,必要な数に達するまで繰り返される.
利点
- すべての個体が非ゼロの確率で選ばれる可能性がある
- 適応度のスケーリングによって選択圧を調整できる
注意
- デフォルトでは
a_rlt = 10.0,b_rlt = 1.0 - 意味のある選択圧を得るためには,適応度のスケーリングが重要である.
下の図は,
$ a $ が比較的小さい場合(左)と比較的大きい場合(右)における
$ p_i $ の例を示している.
$ a $ が小さすぎると選択圧が弱くなり,適応度の高い個体が優先されにくくなる.

組成可変型進化的アルゴリズム (EA-vc)
2025年7月7日 更新
概要
CrySPY 1.4.0 以降,組成固定型EAを拡張した組成可変型EA(EA-vc)が利用可能になった.
サポートしているインターフェースはこちらを確認すること(インターフェース).
全体の流れは組成固定型EAと類似しているが,EA-vcでは異なる組成に対応するために,適応度の評価方法と子個体の生成方法が異なる.
ここでは,元のEAから変更された部分について説明する.
バージョン1.4.1からは電荷中性条件を課した構造生成が可能になった.
手順
- 個体群(population)の初期化
- 適応度(fitness)の評価
- 自然選択
- 親個体の選択
- 次世代の生成
- ステップ2(適応度の評価)に戻り繰り返す
個体群(population)の初期化
第一世代では,n_pop で指定された数のランダム構造が生成される.
EAおよびEA-vcでは tot_struc は使用されない.
EA-vcでは,各原子種の原子数は,ユーザーが定義した範囲内でランダムに決定される.
各原子種ごとの原子数の最小値(ll_nat)および最大値(ul_nat)は,以下のように cryspy.in で指定することができる.
[structure]
atype = Cu Au
ll_nat = 0 0
ul_nat = 8 8
適応度(fitness)の評価
異なる原子数を持つ構造の全エネルギーを直接比較することには意味がないため,異なる組成間の相安定性を評価するために,形成エネルギーから計算された凸包(convex hull)が用いられる.
形成エネルギー,凸包,相図に関する情報はオンラインで参照できる.
例えば,Materials Project Documentation を参照のこと.
EA-vcでは,適応度は energy above hull(hull distanceとも呼ばれる)として定義されている.

形成エネルギー
形成エネルギーは,基準となる安定な単体のエネルギー(eV/atom)に基づいて計算され,これらは cryspy.in の end_point で指定される.
例えば,Cu–Auの2元系の場合,end_point にはfcc-Cuおよびfcc-Auの1原子あたりのエネルギー(eV/atom)をこの順で記述する必要がある.
構造探索中に,end_point と同じ組成を持つ構造が見つかり,そのエネルギーが対応する end_point の値よりも低かったとしても,形成エネルギーの計算には依然として cryspy.in に定義された元の end_point の値が用いられることに注意すること.
凸包(Convex hull)
ある構造の形成エネルギーと,その組成におけるconvex hull上のエネルギーとの差は,energy above hull(hull distanceとも呼ばれる)と呼ばれる.
この値は,同じ組成における最も安定な相の組み合わせと比べて,その構造の形成エネルギーがどれだけ高いかを示している.
hull distanceが0の構造はconvex hull上にあり,熱力学的に安定である.
組成固定型EAとは異なり,EA-vcではconvex hullの計算時に構造の1原子あたりのエネルギーに基づいてフィルタリングを行い,以下の条件を用いる:
$$ \mathrm{emin\_ea} \le E \le \mathrm{emax\_ea} $$
このフィルタリングは形成エネルギーではなく,あくまで1原子あたりの全エネルギーに基づいて行われることに注意すること.
convex hullの計算には,pymatgen のPhaseDiagramクラスを使用している.
形成エネルギーの場合とは異なり,end_point と同じ組成を持つ構造が対応する end_point の値よりも低いエネルギーを持っていた場合,その構造がconvex hullおよびhull distanceを計算する際の基準として使用される.
自然選択
下図に示すように,EA-vcではhull distanceが0の安定構造が複数得られる場合がある.
このような場合,複数の個体がhull distanceにおいて同率の最上位ランクを占めることになる.
n_eliteで指定されたエリート構造の数が,同率ランクの個体数より少ない場合,選択には任意性が生じる.
現在のところ,CrySPYではhull distanceが0.001 eV/atom未満の個体の中から,n_elite 個をランダムに選択している.
hull distanceが 0.001 eV/atom未満の個体数が n_elite より少ない場合には,通常通り,適応度に基づくランキングによってエリート構造が選択される.
エリート個体を選択する際にも,pymatgen のStructureMatcherクラスを用いて重複構造を排除している.

エリート個体は,過去の世代で得られた最良の構造に基づいて選択される.
しかし,hull distanceは世代ごとに変化する可能性があるため,自然選択を行う前に,現在のconvex hullを用いてエリート個体のhull distanceを再計算している.
Convex hullセクションで述べたように,EA-vcでは,emin_eaおよびemax_eaは自然選択では使用されない.
親個体の選択
親個体の選択方法は組成固定型EAと同様である.
次世代の生成
進化的操作
crossover(vc)の操作は,組成固定型EAのものとわずかに異なるが,permutationおよびstrainは同一である.
EA-vcでは,組成可変にするためにいくつかの新しい操作が導入されている.
個体群の数
crossover,permutation,strain,addition,elimination,substitution,およびランダム生成による構造の合計は,n_pop と等しくなければならない.
n_pop = n_crsov + n_perm + n_strain + n_add + n_elim + n_subs+ n_rand
組成可変型進化的アルゴリズム (EA-vc)のサブセクション
Crossover (vc)
組成可変型のcrossoverは,組成固定型のバージョンとほとんど同じであるが,原子数の調整が最小限に抑えられている点が異なる.
組成固定型crossoverのステップ6では,各原子種ごとの原子数の差を直接計算する.
一方,crossover(vc)では,ll_nat と ul_nat で定義された許容範囲に基づいて原子数の差を計算する.
例えば,次のようになる:
ll_nat = [4, 4, 4]
ul_nat = [8, 8, 8]
offspring_nat = [2, 6, 12]
nat_diff = [-2, 0, 4]
上記の例でいう nat_diff にあたる原子数の差が,許容値 nat_diff_tole を超えている場合は,この操作はやり直される.
そうでない場合は,原子数が ll_nat と ul_nat で定義された範囲に収まるように調整される.
Addition
2025年7月7日 更新
現在の原子数が ul_nat で指定された上限を超えない原子種をランダムに選択し,その原子をランダムな位置に1個追加する.
バージョン1.4.1からは複数の原子を追加する機能を搭載.追加する原子数はadd_max以下の自然数からランダムに選択される.
デフォルトではadd_max = 3.
- 原子を1個追加し,それが
mindist で指定される最小原子間距離の制限を満たしているかチェック. - 距離の条件を満たさない場合は,別のランダムな位置に再配置する.この処理は最大
maxcnt_ea 回まで繰り返される. - (since version 1.4.1) ランダムに決められた原子数(
add_max以下)が追加されるまで繰り返す. - 有効な子個体が得られなければ,体積を10%拡張して,同じ処理を最大
maxcnt_ea 回まで再試行する. - それでも失敗した場合は,体積を最大20%まで拡張して構造生成を試みる.それでもうまくいかない場合は,親個体を変更する.

Elimination
2025年7月7日 更新
現在の原子数が ll_nat で指定された下限を上回っている原子種をランダムに選択し,その原子を1個削除する.
バージョン1.4.1からは複数の原子を削除する機能を搭載.削除する原子数はelim_max以下の自然数からランダムに選択される.
デフォルトではelim_max = 3.

Substitution
2025年7月7日 更新
Substitutionは,2つの異なる原子種をランダムに選択し,位置を入れ替える操作である.
バージョン1.4.1からは複数の原子を入れ替える機能を搭載.入れ替える原子数はsubs_max以下の自然数からランダムに選択される.
デフォルトではsubs_max = 3.
- 入れ替え後の構造の原子数が最小原子数(
ll_nat)と最大原子数(ul_nat)を超えないように制限. - 最終的に,
mindist で指定される最小原子間距離の制限をチェックし,問題がなければその構造を子個体として採用する.

Bayesian optimizaion (BO)
under construction
One of the selection-type algorithms.
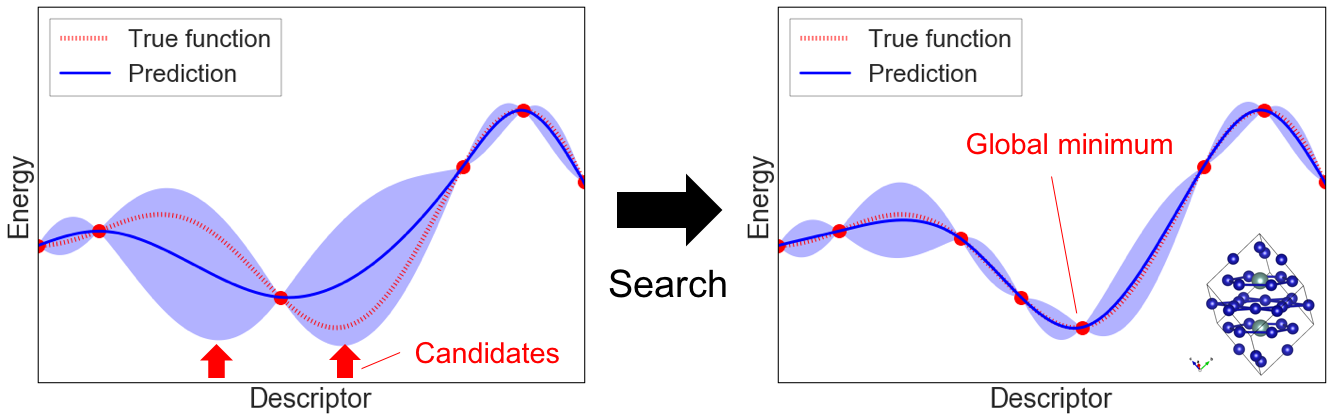
Reference
- T. Yamashita, N. Sato, H. Kino, T. Miyake, K. Tsuda, and T. Oguchi, Phys. Rev. Mater. 2, 013803 (2018).
- N. Sato, T. Yamashita, T. Oguchi, K. Hukushima, and T. Miyake, Phys. Rev. Mater. 4, 033801 (2020).
LAQA
選択型アルゴリズムの一つ.
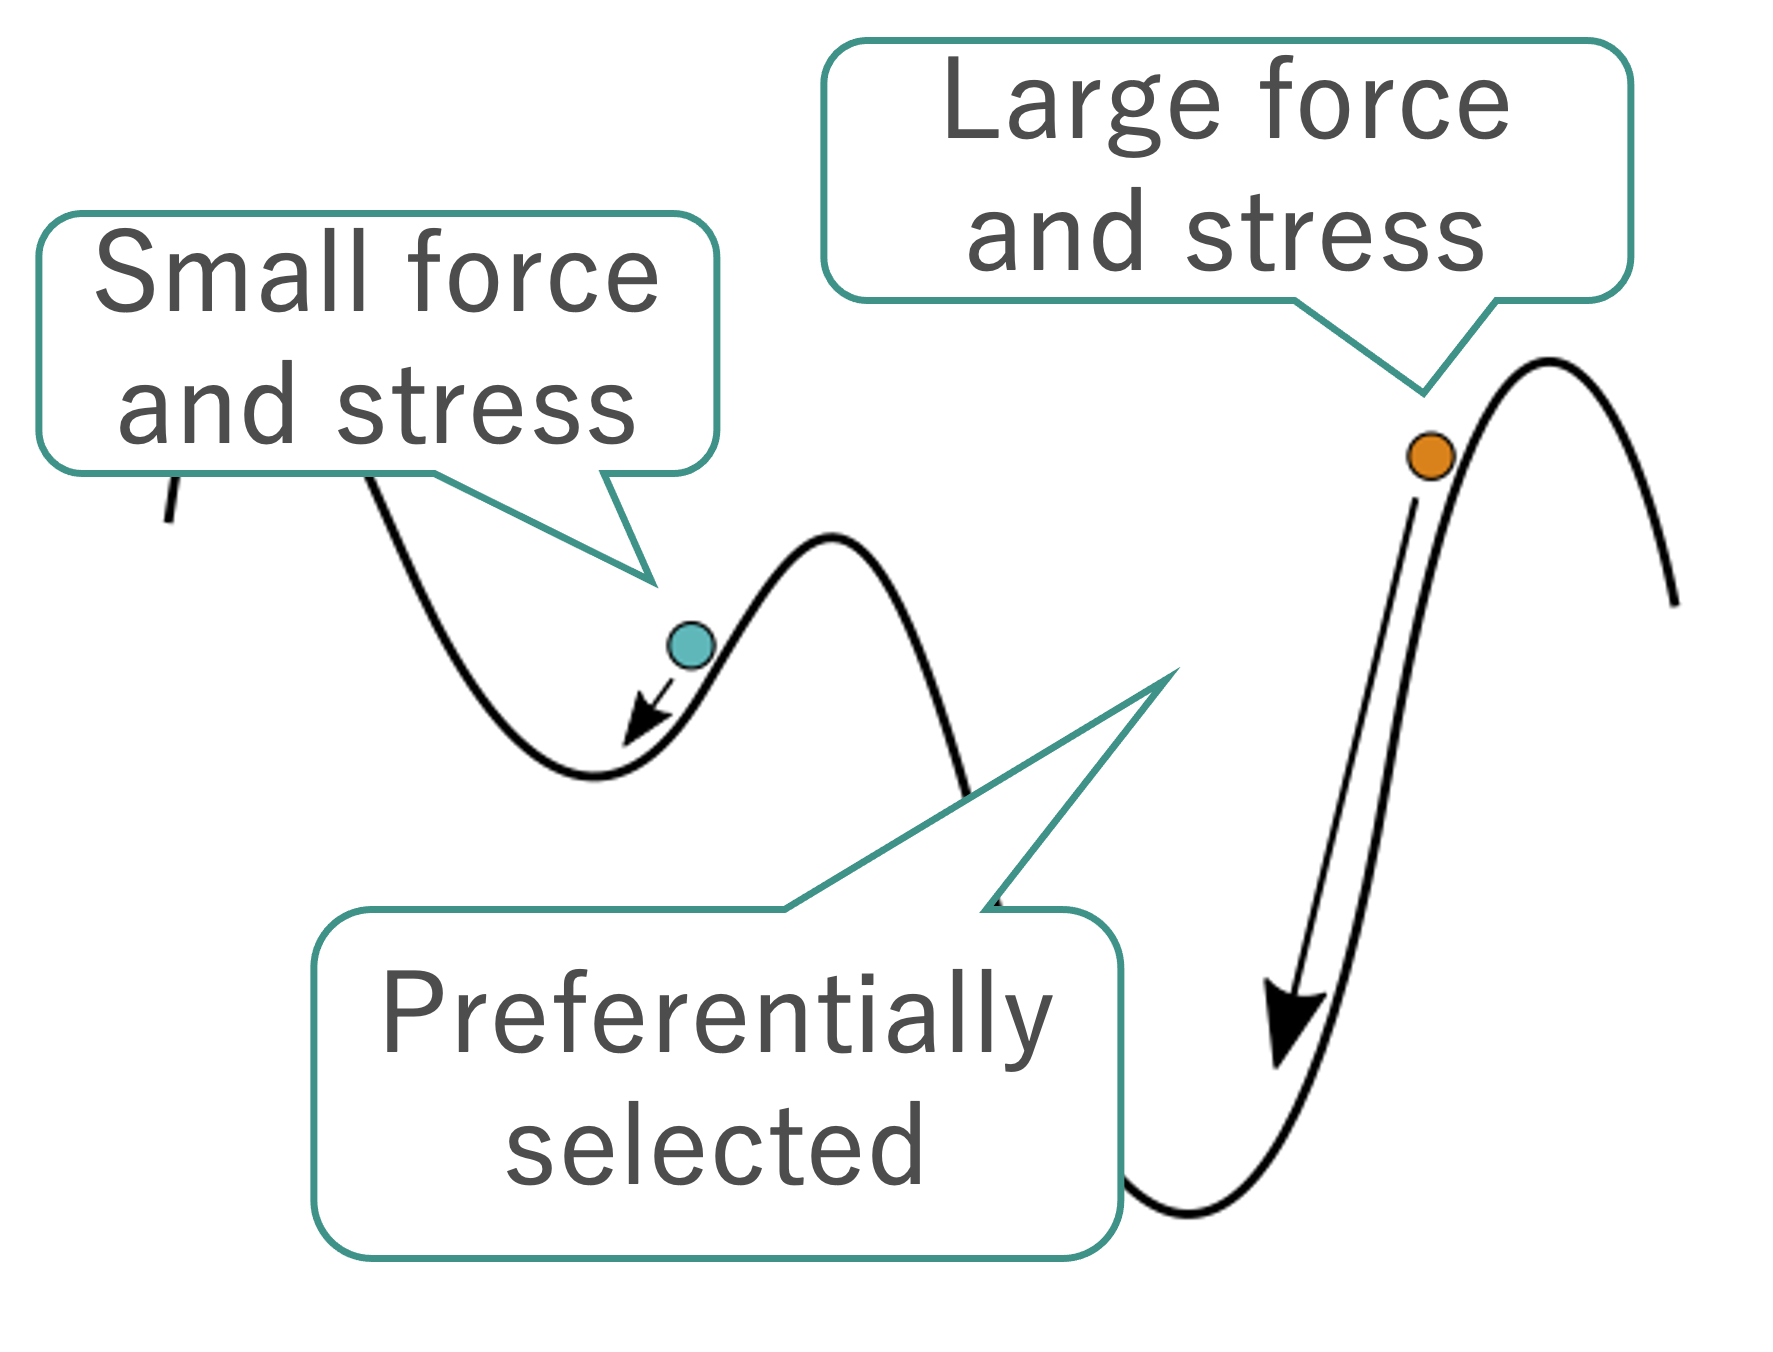
Score
$ L $
$$ L = -E + w_F \frac{F^2}{2\Delta F} + w_S S. $$| Symbol | Note |
|---|
| $$ E $$ | エネルギー(eV/atom) |
| $$ w_F $$ | 力の項の重み. Default:
$ w_F = 0.1$ |
| $$ F $$ | 原子に働く力の平均ノルム(eV/Å) |
| $$ \Delta F $$ | 一つ前のステップからの
$ F $の差の絶対値.はじめのステップでは
$ \Delta F = 1$.
$ \Delta F = 10^{-6}$ if
$ \Delta F \le 10^{-6} $. |
| $$ w_S $$ | ストレス項の重み.Default:
$ w_S = 10.0$ |
| $$ S $$ | ストレステンソルにおける成分の絶対値平均(eV/Å^3). |
Reference
機能のサブセクション
Logging
2023 July 10
CrySPY 1.2.0からPython標準ライブラリのloggingを採用.
CrySPYのログは画面とファイル(log_cryspy and err_cryspy)の両方に出力される.
- log –> screen and
log_cryspy - error and warning –> screen and
err_cryspy
ログの例:
[2023-07-10 18:40:54,389][cryspy_init][INFO]


Start CrySPY 1.2.0


[2023-07-10 18:40:54,389][cryspy_init][INFO] # ---------- Read input file, cryspy.in
[2023-07-10 18:40:54,390][read_input][INFO] Save input data in cryspy.stat
[2023-07-10 18:40:54,391][cryspy_init][INFO] # ---------- Initial structure generation
[2023-07-10 18:40:54,391][cryspy_init][INFO] Number of MPI processes: 1
[2023-07-10 18:40:54,391][gen_init_struc][INFO] # ------ mindist
[2023-07-10 18:40:54,395][struc_util][INFO] Cu - Cu: 1.32
[2023-07-10 18:40:54,395][gen_init_struc][INFO] # ------ generate structures
[2023-07-10 18:40:54,481][gen_pyxtal][INFO] Structure ID      0 was generated. Space group:   1 -->   1 P1
[2023-07-10 18:40:54,493][gen_pyxtal][INFO] Structure ID      1 was generated. Space group:  28 -->  28 Pma2
[2023-07-10 18:40:54,498][gen_pyxtal][INFO] Structure ID      2 was generated. Space group:  29 -->  29 Pca2_1
[2023-07-10 18:40:54,704][gen_pyxtal][INFO] Structure ID      3 was generated. Space group: 137 --> 137 P4_2/nmc
[2023-07-10 18:40:54,725][gen_pyxtal][INFO] Structure ID      4 was generated. Space group: 212 --> 214 I4_132
[2023-07-10 18:40:54,800][cryspy_init][INFO] Elapsed time for structure generation: 0:00:00.408367
ログを画面に出力させたくないときは下記のように-n オプションをつけて実行する.
バックアップ
2024 Dec. 22 updated
CrySPYはシンプルなバックアップ機能を備えている.
バックアップの対象は以下のファイル:
- cryspy.in
- cryspy.stat
- log_cryspy
- err_cryspy
- debug_cryspy
- cryspy_interactive.ipynb
- calc_in/*
- data/*
work/* は含まれいないので注意.
- (v1.1.0以降) 上記ファイルが日付と時間で名前づけられたディレクトリにコピーされる.以前のバックアップは自動的には削除されない.
- (v1.0.0) バックアップは1世代分のみであり,それより古いものは削除される.
自動バックアップ
自動的にバックアップされるタイミングは次の通り:
- 次の選択に移るとき(BO, LAQA)か世代交代を行うとき (EA)
- 構造を追加するとき
手動バックアップ
手動でバックアップを行いたい場合は,-b または --backup オプションをつけて次のようにcryspyを実行する:
cryspy -b
このコマンドは通常の実行とは異なり,バックアップだけを行います.
クリーン
2024 Dec. 22 updated
CrySPYはシンプルなクリーン機能を備えている.
初めからやり直したい時に便利となる.
以下のファイルがクリーン(実際はファイルを移動するだけ)される.
- cryspy.stat
- log_cryspy
- err_cryspy
- lock_cryspy
- data/*
- work/*
- tmp_gen_struc/*
クリーンする場合は-c または --clean オプションをつけてcryspyを実行する:
$ ls
calc_in  cryspy.in  cryspy.stat  data  err_cryspy  log_cryspy
$ cryspy -c
Are you sure you want to clean the data? 'yes' or 'no' [y/n]: y
$ ls
calc_in  cryspy.in  trash
$ ls trash
20230318_100728
calc_in/* と cryspy.in 以外のファイルがtrashの中の日付と時間で名前づけられたディレクトリに移動します.
必要なければ手動で削除してください.
原子間距離の制限
2025年6月17日 更新
構造生成時に原子間距離の制限を行うことができる.
下記はA-B 2元系における[structure]セクションの最低原子間距離の設定例.
[structure]
natot = 8
atype = A B
nat = 4 4
mindist_1 = 2.0 1.8
mindist_2 = 1.8 1.5
原子A-A,B-BおよびA-B間の最低原子間距離がそれぞれ2.0,1.8および1.5 Åに設定されている.
原子間距離がこの値よりも小さい構造は自動的に棄却される.
3元系では mindist_1,mindist_2およびmindist_3が必要になる.
mindistの行列は対称行列でなければならない.
CrySPY 1.4.0以降では,この最低原子間距離のチェックは構造最適化後にも行われる.
導入した理由は,機械学習ポテンシャルなどでは時々原子がほぼ重なるような構造が得られてしまうため.
cryspy.inで下記のようにすることでこの機能をオフにすることもできる(デフォルトはオン)
[option]
check_mindist_opt = False
Example: Na8Cl8
Without mindist
cryspy.in
[basic]
algo = RS
calc_code = VASP
tot_struc = 5
nstage = 2
njob = 2
jobcmd = qsub
jobfile = job_cryspy

[structure]
natot = 16
atype = Na Cl
nat = 8 8

[VASP]
kppvol = 40 80

[option]
log_cryspy
[2024-04-23 13:46:28,598][cryspy_init][INFO]


Start CrySPY 1.2.3


[2024-04-23 13:46:28,598][cryspy_init][INFO] # ---------- Read input file, cryspy.in
[2024-04-23 13:46:28,598][read_input][INFO] Save input data in cryspy.stat
[2024-04-23 13:46:28,599][gen_init_struc][INFO] # ------ mindist
[2024-04-23 13:46:28,601][struc_util][INFO] Na - Na: 1.66
[2024-04-23 13:46:28,602][struc_util][INFO] Na - Cl: 1.3399999999999999
[2024-04-23 13:46:28,602][struc_util][INFO] Cl - Cl: 1.02
...
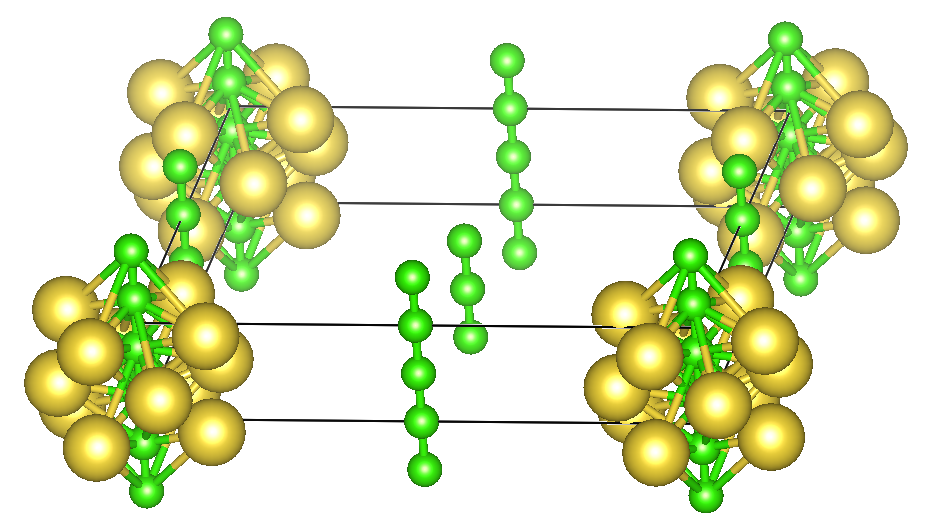
PyXtalのデフォルト設定では,上の図のように原子同士が近すぎる場合があるので,mindistを設定することをすすめる.
DFT計算もやりやすくなるであろう.
With mindist
cryspy.in
[basic]
algo = RS
calc_code = VASP
tot_struc = 5
nstage = 2
njob = 2
jobcmd = qsub
jobfile = job_cryspy

[structure]
natot = 16
atype = Na Cl
nat = 8 8
mindist_1 = 2.5 1.5
mindist_2 = 1.5 2.5

[VASP]
kppvol = 40 80

[option]
log_cryspy
[2024-04-23 14:06:21,955][cryspy_init][INFO]


Start CrySPY 1.2.3


[2024-04-23 14:06:21,955][cryspy_init][INFO] # ---------- Read input file, cryspy.in
[2024-04-23 14:06:21,956][read_input][INFO] Save input data in cryspy.stat
[2024-04-23 14:06:21,956][gen_init_struc][INFO] # ------ mindist
[2024-04-23 14:06:21,956][struc_util][INFO] Na - Na: 2.5
[2024-04-23 14:06:21,956][struc_util][INFO] Na - Cl: 1.5
[2024-04-23 14:06:21,956][struc_util][INFO] Cl - Cl: 2.5
イオン結晶のような場合には,カチオン同士,アニオン同士が離れるような設定をしておくと良い.
ジョブファイルの自動書き換え
2025年7月10日 更新
CrySPYのジョブファイルで,CrySPY_IDという文字列は自動的に構造IDに置換される.
PBSやSLURMなどのジョブスケジューラーを使う時,ジョブ名に構造IDを使うと便利である.
例えばPBSでは, #PBS -N Si_CrySPY_IDが#PBS -N Si_15に置き換わる
大抵の場合,ジョブ名は数字から始められないことが多いので,Si_のように英字から始めておくと良い.
また,バージョン1.4.2からは末尾に以下のコマンドを書く必要はなくなった.CrySPYが自動で追記する.
sed -i -e '3s/^sub.*/done/' stat_job
例えばこのようなジョブファイルを./calc_in/job_cryspy(job_cryspyはcryspy.inのjobfileで指定するファイル名)に準備しておくと
#!/bin/sh
#$ -cwd
#$ -V -S /bin/bash
####$ -V -S /bin/zsh
#$ -N Si8_CrySPY_ID
#$ -pe smp 20
####$ -q ibis1.q
####$ -q ibis2.q

mpirun -np $NSLOTS pw.x < pwscf.in > pwscf.out


if [ -e "CRASH" ]; then
    sed -i -e '3 s/^.*$/skip/' stat_job
    exit 1
fi
例えばIDが15の場合,CrySPYが./work/15/job_cryspyを下記のように書き換える.
5行目のCrySPY_IDが15に置換され,末尾にsedのコマンドが追記される.
#!/bin/sh
#$ -cwd
#$ -V -S /bin/bash
####$ -V -S /bin/zsh
#$ -N Si8_15
#$ -pe smp 20
####$ -q ibis1.q
####$ -q ibis2.q

mpirun -np $NSLOTS pw.x < pwscf.in > pwscf.out


if [ -e "CRASH" ]; then
    sed -i -e '3 s/^.*$/skip/' stat_job
    exit 1
fi

# ---------- CrySPY
sed -i -e '3s/^sub.*/done/' stat_job
MPI並列化を用いた構造生成
2023/10/21 update
CrySPYのバージョン1.1.0(1.2.3以上の利用を推奨)からは,MPIを用いたランダム構造生成が可能になった.
MPIを使うにはPython環境にmpi4pyをインストールする必要がある.
当然,計算に利用するワークステーション等にMPIライブラリ(Open MPI,Intel MPI,MPICHなど)も必要である.
情報
MPIを使うのに下記が必要
- CrySPY
1.1.0 1.2.3 or later - mpi4py
- MPI library (Open MPI, Intel MPI, MPICH, etc.)
警告
1.1.0 <= CrySPY <=1.2.2ではバグがあった.
MPIを使ったジョブをbashやzshで実行するとき(e.g., jobcmd = zsh, jobfile = job_cryspy),MPIのジョブが流れない.
qsubやsbatchでジョブスケジューラーを使う場合は問題ない。
このバグはバージョン1.2.3で修正.
下の図にSi8原子1000構造をランダムに生成するのにかかった時間とMPIプロセス数の関係を示す.下記のセッティングを使った.
[basic]
algo = RS
calc_code = soiap
tot_struc = 1000
nstage = 1
njob = 2
jobcmd = zsh
jobfile = job_cryspy

[structure]
natot = 8
atype = Si
nat = 8
mindist_1 = 2.2
mindset_1 = 2.2のように厳し目に設定して,わざと時間がかかるようにしてある.
それぞれのプロセス数において10回ずつ実行して,平均を線で結んでいる.
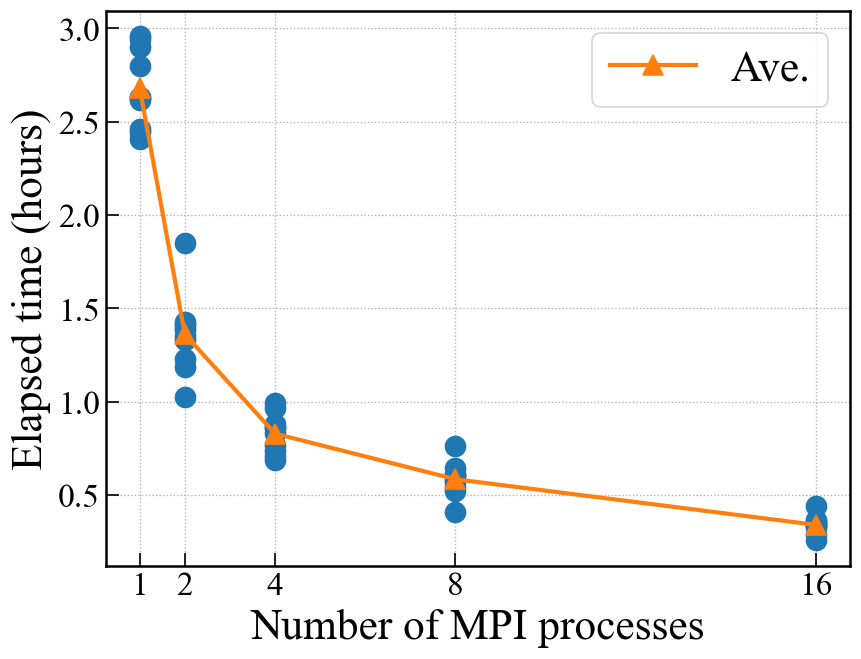
Run
Enthalpy
2023/10/18
情報
Requirements:
- CrySPY 1.2.2 or later
- VASP or QE
高圧化における構造探索を行う時に, エネルギーの代わりにエンタルピーを使うことができる.
VASPとQE以外はまだ未対応.
cryspy_rsltやcryspy_rslt_energy_ascのE_eV_atomの箇所がエンタルピー(eV/atom)に変わる.
下記は40 GPaにおけるSr4O4の構造探索の結果の例.
高圧下ではCsCl型構造(ID 5)がNaCl型構造よりも安定になっている.
   Spg_num Spg_sym  Spg_num_opt Spg_sym_opt  E_eV_atom  Magmom      Opt
5       26  Pmc2_1          221       Pm-3m  -2.276790     NaN     done
6      225   Fm-3m          225       Fm-3m  -2.244800     NaN     done
1      101  P4_2cm          107        I4mm  -2.181115     NaN     done
4      123  P4/mmm          123      P4/mmm  -2.034509     NaN  not_yet
3       20  C222_1           63        Cmcm  -0.686541     NaN     done
2       75      P4           75          P4  -0.008713     NaN  not_yet
9       51    Pmma           47        Pmmm   0.096430     NaN     done
8       65    Cmmm          123      P4/mmm   1.099657     NaN     done
0      187   P-6m2          187       P-6m2   1.292124     NaN     done
7       53    Pmna           53        Pmna   5.153504     NaN  not_yet
VASP
CrySPYではOSZICARからエネルギー(エンタルピー)を読んでいる.
これはPSTRESSがINCAR_xで以下のようにセットされると自動的にエンタルピーに変わる:
cryspy.inでは特に何もする必要はない.
energy_step_flagのオプションも使用可能でエンタルピーを読み込める.
Example: CrySPY utility > examples > qe_Sr4O4_RS_pv_term
QE
エンタルピーを読むためにはcryspy.inのQEセクションでpv_term = Trueをつける:
[QE]
qe_infile = pwscf.in
qe_outfile = pwscf.out
kppvol =  40  80
pv_term = True
QEの入力ファイルでもpressの設定を忘れずに:
警告
QEではenergy_step_flagオプションでエンタルピーを読むことにまだ未対応.
As library
2024 May 31
Cryspy can be used as a library to generate random structures or structures by evolutionary algoritym.
The jupyter notebook is available in CrySPY utility > notebook > as_library.
Random structure generation
####
#### when you change set_logger(), you need to restart the kernel
####
from cryspy.util.utility import set_logger    # optional
set_logger()    # optional
#set_logger(noprint=True, logfile='log_cryspy', errfile='err_cryspy')    # write log and err messages to files

from cryspy.RS.gen_struc_RS import gen_pyxtal

nstruc = 10
atype = ('Na', 'Cl')
nat = (4, 4)
mindist = ((2.0, 1.5),
           (1.5, 2.0))
spgnum = 'all'

init_struc_data = gen_pyxtal.gen_struc(
    nstruc=nstruc,
    atype=atype,
    nat=nat,
    mindist=mindist,
    spgnum=spgnum,
)
You can get init_struc_data (dict: {ID: pymatgen Strcture, …})
Structure generation by evolutionary algorithm
Situation: parent A (, parent B) –> child
Prepare two (one) parent structures as pymatgen Structure object.
In this example, just use the results of RS for Cu4Au4 (see, CrySPY utility > notebook > as_library).
import pickle
with open('./Cu4Au4_sample/opt_struc_data.pkl', 'rb') as f:
    opt_struc_data = pickle.load(f)
Crossover
from cryspy.EA.gen_struc_EA import crossover

# you can change parent_A and parent_B
parent_A = opt_struc_data[0]
parent_B = opt_struc_data[1]

atype = ('Cu', 'Au')
nat = (4, 4)
mindist = ((1.5, 1.5),
           (1.5, 1.5))

child = crossover.gen_child(
    atype=atype,
    nat=nat,
    mindist=mindist,
    parent_A=parent_A,
    parent_B=parent_B,
)

# child: pymatgen Structure
Permutation
from cryspy.EA.gen_struc_EA import permutation

# you can change parent_A
parent_A = opt_struc_data[0]

atype = ('Cu', 'Au')
nat = (4, 4)
mindist = ((1.5, 1.5),
           (1.5, 1.5))
ntimes = 1    # number of times to perform permutatio

child = permutation.gen_child(
    atype=atype,
    mindist=mindist,
    parent_A=parent_A,
    ntimes=ntimes,
)

# child: pymatgen Structure
Strain
from cryspy.EA.gen_struc_EA import strain

atype = ('Cu', 'Au')
nat = (4, 4)
mindist = ((1.5, 1.5),
           (1.5, 1.5))
sigma_st = 0.05    # standard deviation of strain

child = strain.gen_child(
    atype=atype,
    mindist=mindist,
    parent_A=parent_A,
    sigma_st=sigma_st,
)
Situation: parent group, fitness –> children
Data set
Prepare structure and fitness (energy) data as dict. The key is structure ID. In this example, just use the results of RS for Cu4Au4 (see, CrySPY utility > notebook > as_library)..
e.g.
struc_data = {0: (pymatgen Structure), 1: (pymatgen Structure), …}
fitness = {0: 0.019632287242441926, 1: -0.005437509701440302, …}
import pickle
with open('./Cu4Au4_sample/opt_struc_data.pkl', 'rb') as f:
    opt_struc_data = pickle.load(f)
with open('./Cu4Au4_sample/rslt_data.pkl', 'rb') as f:
    rslt_data = pickle.load(f)

struc_data = opt_struc_data    # dict
fitness = rslt_data['E_eV_atom'].to_dict()    # you may include None or np.nan for values
Survival of the fittest
from cryspy.EA.survival import survival_fittest
from cryspy.EA.gen_struc_EA.select_parents import SelectParents
from cryspy.EA.gen_struc_EA import crossover, permutation, strain

n_fittest = 5    # number of survivors

ranking, _, _ = survival_fittest(
    fitness=fitness,
    struc_data=struc_data,
    elite_struc=None,
    elite_fitness=None,
    n_fittest=n_fittest,
    fit_reverse=False,
    emax_ea=None,
    emin_ea=None,
)

# ranking <-- e.g. [2, 1, 0, 7, 9] without structure duplicaiton
Select parents class
sp = SelectParents(ranking)    # after set_xxx, we can use sp.get_parents(n_parent)
sp.set_tournament(t_size=2)
Crossover
atype = ('Cu', 'Au')
nat = (4, 4)
mindist = ((1.5, 1.5),
           (1.5, 1.5))
n_crsov = 5    # number of structures to be generated by crossover
#id_start = len(init_struc_data)  # next Structure ID
id_start = 10

co_children, co_parents, co_operation = crossover.gen_crossover(
    atype=atype,
    nat=nat,
    mindist=mindist,
    struc_data=struc_data,
    sp=sp,
    n_crsov=n_crsov,
    id_start=id_start,
)

# co_children <-- dict {ID: pymatgen Structure, ID: pymatgen Structure, ...}
# co_parents  <-- e.g. {10: (2, 7), 11: (2, 1), 12: (2, 1), 13: (0, 2), 14: (2, 1)}
# co_operation <-- e.g. {10: 'crossover', 11: 'crossover', ...}
Permutation
n_perm = 5    # number of structures to be generated by permutation
#id_start = len(init_struc_data) + n_crsov   # next Structure ID
id_start = 15
ntimes = 1    # number of times to perform permutation

pm_children, pm_parents, pm_operation = permutation.gen_permutation(
    atype=atype,
    mindist=mindist,
    struc_data=struc_data,
    sp=sp,
    n_perm=n_perm,
    id_start=id_start,
    ntimes=ntimes,
)

# pm_children <-- dict {ID: pymatgen Structure, ID: pymatgen Structure, ...}
# pm_parents  <-- e.g. {15: (2,), 16: (1,), 17: (2,), 18: (1,), 19: (1,)}
# pm_operation <-- e.g. {15: 'permutaion', 16: 'permutation', ...}
Strain
n_strain = 5    # number of structures to be generated by strain
#id_start = len(init_struc_data) + n_crsov + n_perm   # next Structure ID
id_start = 20
sigma_st = 0.05    # standard deviation of strain

st_children, st_parents, st_operation = strain.gen_strain(
    atype=atype,
    mindist=mindist,
    struc_data=struc_data,
    sp=sp,
    n_strain=n_strain,
    id_start=id_start,
    sigma_st=sigma_st,
)

# st_children <-- dict {ID: pymatgen Structure, ID: pymatgen Structure, ...}
# st_parents  <-- e.g. {20: (1,), 21: (2,), 22: (0,), 23: (2,), 24: (2,)}
# st_operation <-- e.g. {20: 'strain', 21: 'strain', ...}
Interactive mode
2025年3月6日
情報
動作環境:
- CrySPY 1.4.0以上
- Jupyter
- ASE対応の構造最適化計算ソフト(汎用機械学習ポテンシャルなど)
- nglview (optional)
PCクラスタやスパコンなどの利用に慣れてない人でも使えるように,Jupyter Notebookを用いたインタラクティブモードが利用可能になった.
ASEを使った構造最適化計算を想定しているので,ASE対応の汎用機械学習ポテンシャルなどが使える.
詳細な使い方はチュートリアル > インタラクティブモード(Jupyter Notebook)を見ること.
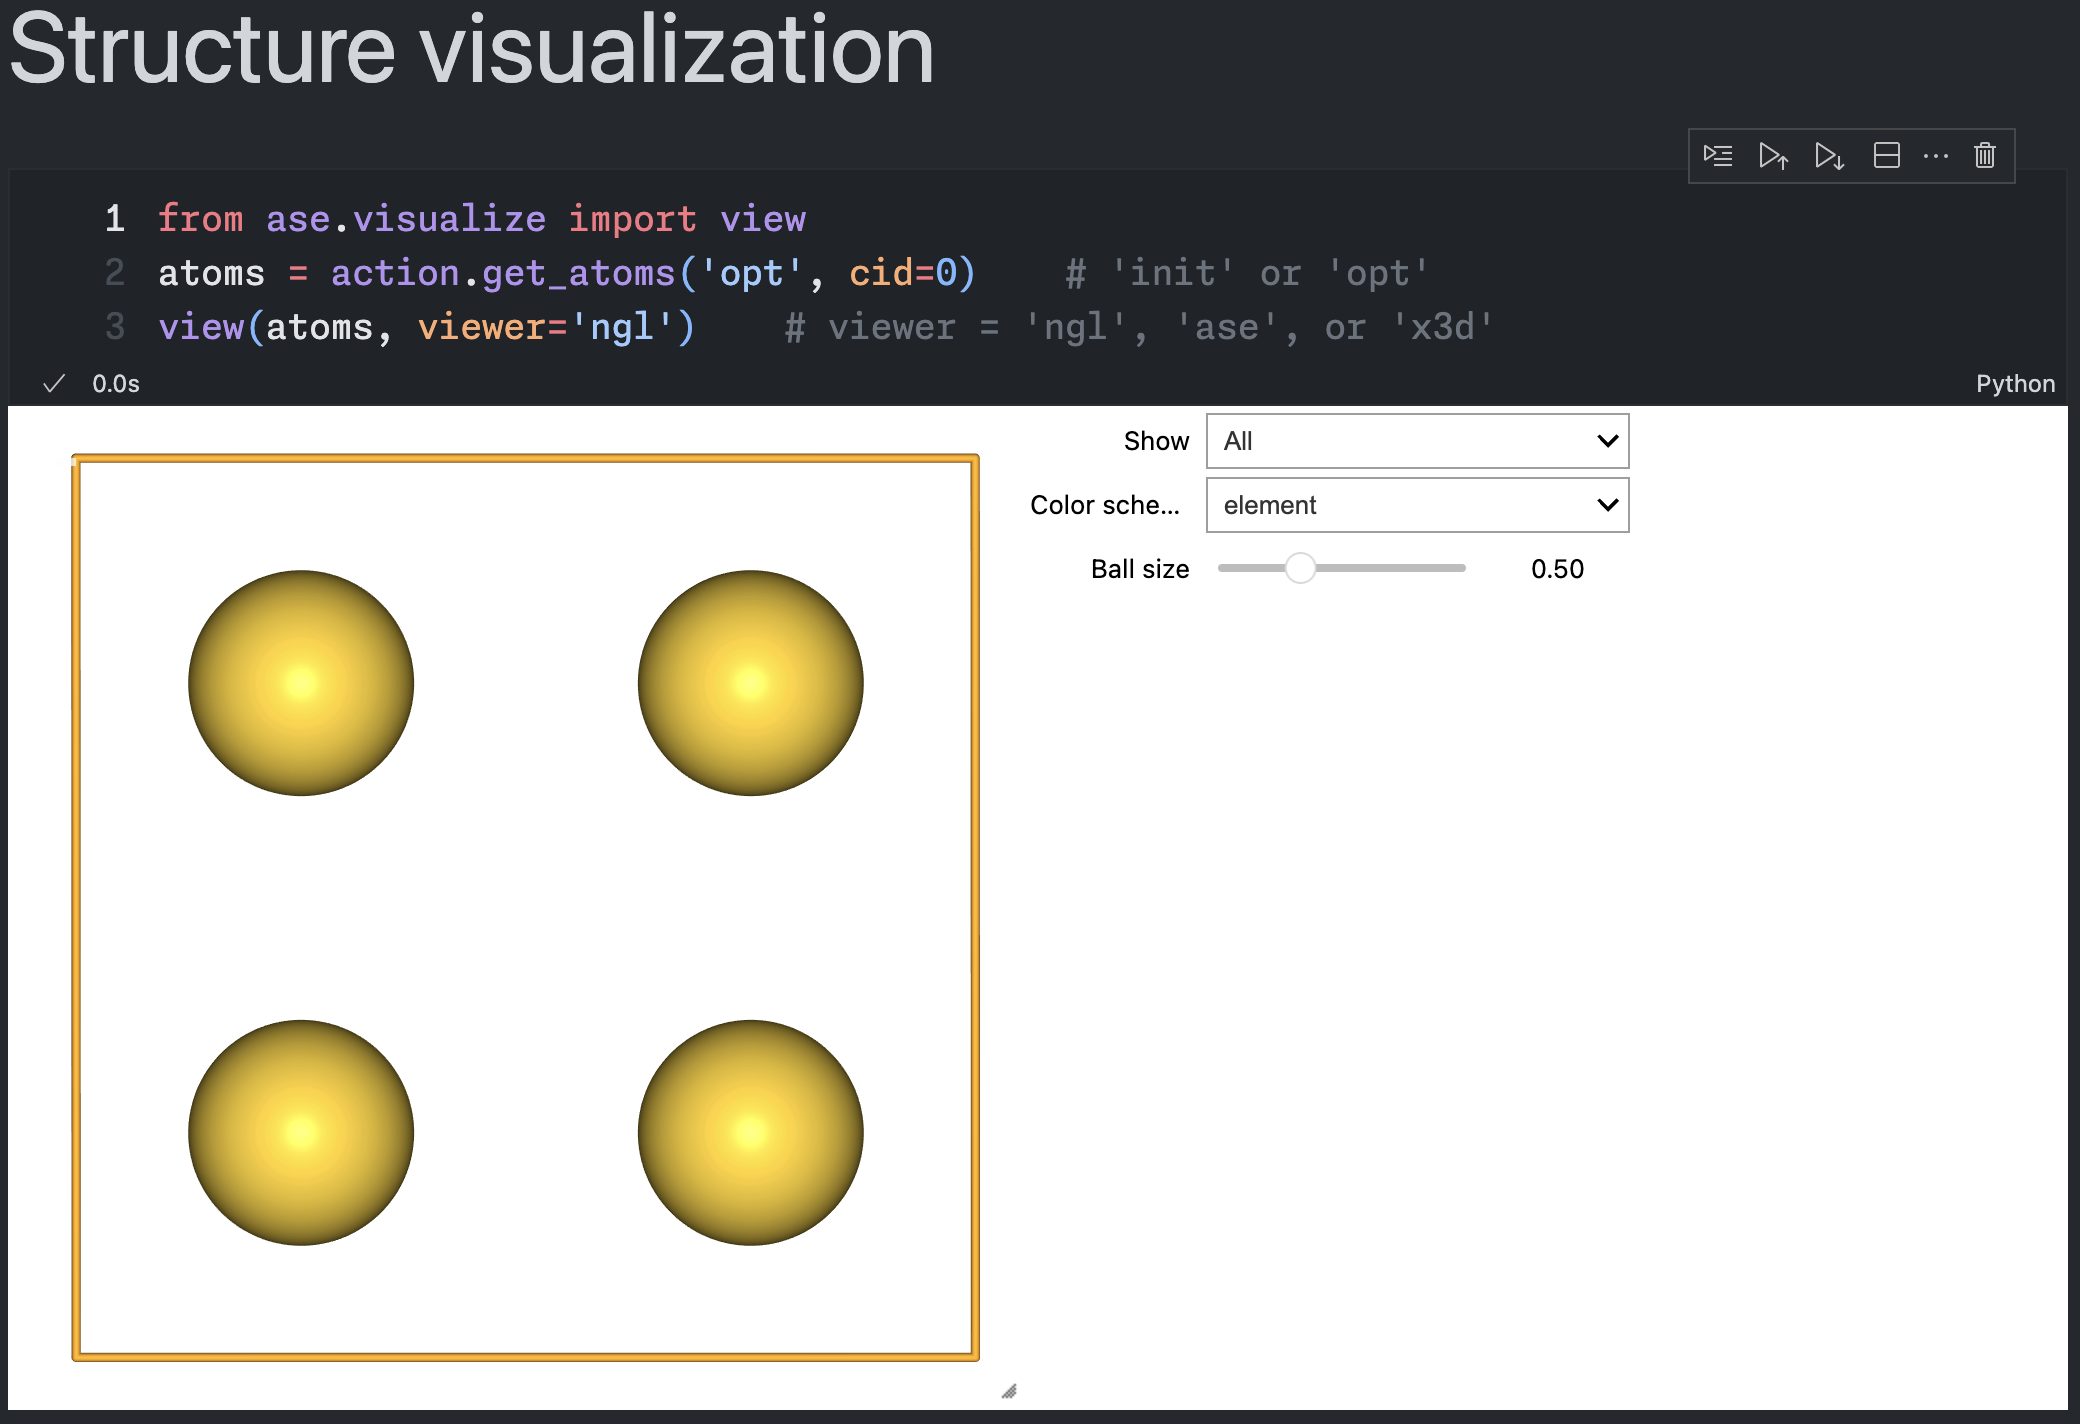


凸包の再プロット
2025年7月3日
CrySPYバージョン1.4.1からcryspy-Eplotというコマンドがインストールされる.
EA-vcでは各世代の計算が終わるごとに自動で凸包の図をプロットして保存しているが,プロット時のパラメータを後で調整したい場合にはcryspy-Eplotコマンドを用いて再プロットできる.
使い方
cryspy.inの[EA]セクションで直接以下のパラメータを変更し,cryspy-Eplotを実行する.
- cgen
- show_max
- label_stable
- vmax
- bottom_margin
- fig_format
cgenはどの世代までプロットに入れるかのパラメータ.デフォルトはNoneで最新世代まで.
EA-vcでは各世代の計算が終わった時点で凸包の計算を行うので,計算途中の世代番号をcgenで指定するとエラーが出る.
画像ファイルは./data/convex_hull/conv_hull_gen_{cgen}.{fig_format}に上書き保存される.
他のパラメータの詳細はCrySPY > チュートリアル > 組成可変型進化的アルゴリズム(EA-vc) > 解析と可視化を参照すること.
電荷中性条件
2025年7月5日
バージョン1.4.1からEA-vcにおいて,構造生成の際に電荷中性条件を課すことが可能になった.
ランダム構造生成にも進化的操作による構造生成にも適用できる.
cryspy.inでそれぞれのatypeに対応する電荷をchargeとして入力する.
cryspy.inの例:
...
[structure]
atype = Li Ca Cl
ll_nat = 0 0 0
ul_nat = 8 8 8
charge = 1 2 -1
...
例えばこの場合,(Li, Ca, Cl) = (4, 0, 4)や(Li, Ca, Cl) = (4, 2, 8)などの電荷中性条件を満たす構造のみ生成される.
下記のようにadd_maxやelim_maxが小さすぎると,原子を追加,削除する際に電荷中性条件を満たす原子数の組合せがゼロになって構造生成できなくなるので注意.
...
[structure]
atype = Li Ca Cl
ll_nat = 0 0 0
ul_nat = 8 8 8
charge = 1 2 -1
...
...
[EA]
add_max = 1
elim_max = 1
例えば上記の場合,add_max = 1の場合,電荷中性条件を満たす原子数の組合せはゼロ.add_max = 2の場合,(Li, Ca, Cl) = (1, 0, 1),つまりLiとClを1個ずつ追加する組合せは(+1) + (-1) = 0で電荷中性条件を満たす.add_max = 3であれば(Li, Ca, Cl) = (1, 0, 1), (0, 1, 2)の組合せがある.
計算のスキップ
2025年7月15日
計算途中でskip
DFT計算などで電子状態がどうしても収束しない場合や,明らかに不安定な構造で途中で計算をやめたい場合,下記の手順でskipできる.
- qdelなどでジョブを止める
./work/xxx/stat_jobの3行目をskipに書き換える- 通常通りcryspyを実行
これで,この構造は切り捨てられて,計算が次へ進む.
cryspy_rslt (rslt_data.pkl) に記録された後にskip
CrySPY version 1.4.2以上
正しくない電子状態等で計算が終わった場合,エネルギーが過剰に低く出力されて,rslt_dataに記録されてしまうことがある.例えば下記の結果は,ID 198のエネルギーが低くなりすぎてしまっている.
cryspy_rslt_energy_asc
     Gen  ...  E_eV_atom  Ef_eV_atom ...
198   10  ...  -5.542899   -1.800631 ...
157    8  ...  -5.598984   -0.356639 ...
186   10  ...  -6.323099   -0.330717 ...
95     5  ...  -6.317931   -0.325549 ...
このデータを取り消してskipするためには,バージョン1.4.2から自動でインストールされるコマンドを使う.
もしskipさせたい構造が複数あるなら,複数のIDを入力する.
これでデータが更新される.
EAまたはEA-vcの場合
EAやEA-vcの場合,skipする構造がエリート構造として登録されている可能性もある.cryspy-skipコマンドを使うとelite_struc.pklとelite_fitness.pklに保存されているデータからskipする構造を取り除く.
EA-vcの凸包の再計算
EA-vcの場合,skipする構造のエネルギーが凸包計算に影響を与える場合がある.そのため,skipさせたあとは,下記コマンドで凸包の再計算を行っておく.
cryspy-calc-convex-hull 10
上記入力の10は世代を表し,10世代時点での凸包の再計算,凸包プロットを行う.
CrySPY utilityのサブセクション
repeat_cryspy
リンク: CrySPY_utility/script/repeat_cryspy
cryspyを何度も手動で実行するのが面倒な時は,自動化スクリプトが利用できる.
この自動化スクリプトはデフォルトで5分に1回cryspyを実行する.
インターバルの時間はスクリプトの下記の部分を編集することで調整できます.
使い方
- repeat_cryspyを作業ディレクトリにコピー
- (optional) インターバルの時間を変更
- repeat_cryspyを実行
ログアウトしてもジョブを実行し続けるためには,nohupコマンドを使う.
[bash]
[zsh]
2023 April 16 update
Link: CrySPY_utility/script/extract_struc.py
init_struc_data.pklやopt_struc_data.pklから構造ごとにcifファイルを出力するスクリプト.
ファイル出力せず,構造情報を画面にプリントすることも可能.
-iオプションでインデックス(構造ID)を(複数)指定できる.
-tオプションでエネルギーが低い順番に指定した構造数のcifファイルを出力可能.
-aオプションの場合は全ての構造をcifファイルに出力する.数が多い場合はディレクトリを作成してそこに移動してから実行したほうが良い.
-sオプションをつけると対称性(空間群)の情報を付けられる.ただし,セルや原子数が変わるので注意.
対称性の情をつける際,--toleranceオプションでtoleranceを変えられる(デフォルトは0.01).
-pオプションをつけるとファイル出力せずに,画面にプリントする.
gzipしたファイルもそのまま読み込み可能(e.g., opt_struc_data.pkl.gz).
更新履歴
- 2024 April 16: –tolerance option, gzip
- 2023 July 21: –print option
使い方
python3 extract_struc.py -h
このスクリプトをPATHが通ったところにおけばpython3を省略できる
usage: extract_struc.py [-h] [-p] [-a] [-i [INDEX ...]] [-t TOP] [-r] [-s] [--tolerance TOLERANCE] infile

positional arguments:
  infile                input file

options:
  -h, --help            show this help message and exit
  -p, --print           just print, e.g., extract_struc.py opt_struc_data.pkl -i 7 10 12 -ps
  -a, --all_id          all structures, e.g., extract_struc.py opt_struc_data.pkl -as
  -i [INDEX ...], --index [INDEX ...]
                        structure ID, e.g., extract_struc.py opt_struc_data.pkl -i 7 10 12 -s
  -t TOP, --top TOP     top k structures, e.g. (k = 3), extract_struc.py opt_struc_data.pkl -t 3 -s
  -r, --rank            add rank in file names, e.g., extract_struc.py opt_struc_data.pkl -t 3 -rs
  -s, --symmetrized     symmetrized structure, e.g., extract_struc.py opt_struc_data.pkl -i 7 10 12 -s
  --tolerance TOLERANCE
                        tolerance for symmetrization (default 0.01), e.g., extract_struc.py opt_struc_data.pkl -i 0 1 -s --tolerance 0.01
例
プリント
-pオプションは-s以外のオプションと組み合わせて使用することができる.
extract_struc.py -p opt_struc_data.pkl -i 0 1
ID 0
Full Formula (Na8 Cl8)
Reduced Formula: NaCl
abc   :   6.823618   6.823618   7.566454
angles:  90.000000  90.000000  96.650518
pbc   :       True       True       True
Sites (16)
  #  SP           a         b         c
---  ----  --------  --------  --------
  0  Na    0         0         1
  1  Na    0         0         0.5
  2  Na    0.704707  0.295293  0.75
  3  Na    0.295293  0.704707  0.25
  4  Na    0.5       0         1
  5  Na    0.5       0         0.5
  6  Na    0         0.5       0.5
  7  Na    0         0.5       0
  8  Cl    0.5       0.5       0
  9  Cl    0.5       0.5       0.5
 10  Cl    0.484753  0.515247  0.75
 11  Cl    0.515247  0.484753  0.25
 12  Cl    0.828247  0.171753  0.851096
 13  Cl    0.171753  0.828247  0.351096
 14  Cl    0.828247  0.171753  0.648904
 15  Cl    0.171753  0.828247  0.148904

ID 1
Full Formula (Na8 Cl8)
Reduced Formula: NaCl
abc   :   8.145021   8.145021   4.324235
angles:  90.000000  90.000000 120.000000
pbc   :       True       True       True
Sites (16)
  #  SP            a          b         c
---  ----  ---------  ---------  --------
  0  Na     0.666667   0.333333  0.736206
  1  Na     0.666667   0.333333  0.263794
  2  Na     0.913147   0.086853  0.5
  3  Na     0.913147   0.826295  0.5
  4  Na     0.173705   0.086853  0.5
  5  Na     0.77711    0.22289   0
  6  Na     0.77711    0.55422   0
  7  Na     0.44578    0.22289   0
  8  Cl     0.027675   0.423376  0.5
  9  Cl    -0.423376  -0.395701  0.5
 10  Cl     0.395701  -0.027675  0.5
 11  Cl    -0.423376  -0.027675  0.5
 12  Cl     0.395701   0.423376  0.5
 13  Cl     0.027675  -0.395701  0.5
 14  Cl     0.333333   0.666667  0.5
 15  Cl     0          0         0
構造ID
extract_struc.py opt_struc_data.pkl -i 7 10 12
以下のファイルが出力される.
7.cif,10.cif,12.cif
対称性の情報ありの場合は-sオプションをつける.
extract_struc.py opt_struc_data.pkl -i 7 10 12 -s
2024 April 16
toleranceパラメーター(デフォルトは0.01)を指定する場合
extract_struc.py opt_struc_data.pkl -i 7 10 12 -s --tolerance 0.01
Top k 構造
情報
rslt_data.pkl がインプット(init_struc_data.pklかopt_struc_data.pkl)と同じディレクトリに必要.
ここでは以下のようにファイルが存在して,
- ./data/pkl_data/opt_struc_data.pkl
- ./data/pkl_data/rslt_data.pkl
cryspy_rslt_energy_ascの中身が下記のものを仮定すると
    Spg_num     Spg_sym  Spg_num_opt Spg_sym_opt    E_eV_atom  Magmom      Opt
9       110      I4_1cd          110      I4_1cd -1284.708037     NaN  not_yet
16        4        P2_1            4        P2_1 -1284.693651     NaN     done
97       92    P4_12_12           91      P4_122 -1284.692494     NaN     done
8        57        Pbcm           57        Pbcm -1284.668504     NaN     done
81       19  P2_12_12_1           19  P2_12_12_1 -1284.635684     NaN     done
...
トップk (ここではk=3) の構造は下記コマンドで出力できる.
extract_struc.py ./data/pkl_data/opt_struc_data.pkl -t 3
ここではrlst_data.pklは./data/pkl_data/の中に存在しなければならない.
9.cif, 16.cif, 97.cifというファイルが出力される.
-rオプションを使うと,ファイル名に順位を含めることができる.
extract_struc.py ./data/pkl_data/opt_struc_data.pkl -t 3 -r
ファイル名は1_9.cif, 2_16.cif, 3_97.cifのようになる.
対称化されたcifの場合は下記のようにする.
extract_struc.py ./data/pkl_data/opt_struc_data.pkl -t 3 -rs
全構造
構造が多い場合はディレクトリを先に作った方が良い.
mkdir init_cifs
cd init_cifs
extract_struc.py /path/to/opt_struc_data.pkl -a
対称化する場合,
extract_struc.py /path/to/init_struc_data.pkl -as
gzipファイル
2024 April 16
gzipされたファイル(拡張子が.gz)も読み込み可能:
extract_struc.py opt_struc_data.pkl.gz -i 0 1 -s
print_pkl.py
2024 May 31
data/pkl_data/にあるピクル化されたファイルをさっとチェックしたい時にprint_pkl.pyを使うと便利.
Usage
python3 print_pkl.py xxxx.pkl
PATHが通っているところにこのpythonスクリプトを置いているならpython3は省略可能.
Example
print_pkl.py init_struc_data.pkl
Number of structures: 10
dict_keys([0, 1, 2, 3, 4, 5, 6, 7, 8, 9])
print_pkl.py input_data.pkl
[basic]
algo = RS
calc_code = ASE
tot_struc = 10
nstage = 1
njob = 5
jobcmd = zsh
jobfile = job_cryspy

[structure]
struc_mode = crystal
natot = 8
atype = ('Cu', 'Au')
nat = (4, 4)
mindist_factor = 1.0
vol_factor = 1.1
symprec = 0.01
spgnum = all
use_find_wy = False

[option]
stop_chkpt = 0
load_struc_flag = False
stop_next_struc = False
append_struc_ea = False
energy_step_flag = False
struc_step_flag = False
force_step_flag = False
stress_step_flag = False

[ASE]
kpt_flag = False
force_gamma = False
ase_python = ase_in.py
print_pkl.py elite_struc.pkl
Number of structures: 2
dict_keys([3, 6])
print_pkl.py elite_fitness.pkl
{3: -325.79973412221455, 6: -324.8381948581405}
pos2pkl.py
2023年7月23日更新
あらかじめ用意した構造のテキストデータをinit_struc_data.pklに変換するスクリプト.
入力のデフォルトはinit_POSCARS形式.オプションでPOSCARやcifファイルなどのシングル構造データも変換可能.
出力はinit_struc_data.pkl.
すでに存在するinit_struc_data.pklに構造データを追加することもできる.
構造IDは考慮されず,新しく割り振られる.
原子数が異なる場合はエラーが出る.
init_struc_data.pklはCrySPYでシミュレーション開始時にロードすることが可能.
-fオプションで原子種の削除とソートが可能.このオプションを指定しないとpymatgenが勝手に電気陰性度の順番で並び替えるので注意!
使い方
usage: pos2pkl.py [-h] [-s [SINGLE ...]] [-f [FILTER ...]] [-p] [infile ...]

positional arguments:
  infile                input file: init_POSCARS

options:
  -h, --help            show this help message and exit
  -s [SINGLE ...], --single [SINGLE ...]
                        input file: single structure file (POSCAR, cif)
  -f [FILTER ...], --filter [FILTER ...]
                        filter (sort): remove species and sort
  -p, --permit_diff_comp
                        flag for permitting different composition
例
init_POSCARS –> init_struc_data.pkl
CrySPYで構造生成後に出力されるinit_POSCARSをスパコン等の別のマシンに移すような場合に使える.複数のファイルを変換可能.
python3 pos2pkl.py init_POSCARS
pos2pkl.pyをPATHが通ったところにおけば,python3は省略可能.
Composition: Na8 Cl8

Converted. The number of structures: 4
Save init_struc_data.pkl
複数の入力ファイルの場合.
python3 pos2pkl.py init_POSCARS init_POSCARS2 init_POSCARS3
Composition: Na8 Cl8

Converted. The number of structures: 12
Save init_struc_data.pkl
カレントディレクトリにすでにinit_struc_data.pklが存在し,それに追加する場合.
python3 pos2pkl.py init_POSCARS
init_struc_data.pkl already exists.
Append to init_struc_data.pkl? [y/n]: y

Load init_struc_data
Composition: Na8 Cl8
The number of structures: 12

Converted. The number of structures: 16
Save init_struc_data.pkl
POSCAR or cif –> init_struc_data.pkl
POSCARファイルやcifファイル等の構造が一つだけのデータも変換可能.-s/--singleオプションが必要.
python3 pos2pkl.py -s POSCAR test.cif
Composition: Na8 Cl8

Converted. The number of structures: 2
Save init_struc_data.pkl
init_POSCARS, POSCAR –> init_struc_data.pkl
python3 pos2pkl.py init_POSCARS -s POSCAR
Composition: Na8 Cl8

Converted. The number of structures: 5
Save init_struc_data.pkl
警告
下記は間違い.init_POSCARSもシングル構造として取り扱われてしまう.
python3 pos2pkl.py -s POSCAR init_POSCARS
Filter (remove and sort)
次のような組成のcifファイルを考える:Sr8 Co8 O20 X4.これはダミー原子(X4)を4原子含んでいる.
-f/--filterオプションは原子種を削除したり,ソートするのに使える.
cryspy.inのatypeと同じように指定する.
python3 pos2pkl.py -s Sr8Co8O20X4.cif -f Sr Co O
Removed species: {'X0+'}
Composition: Sr8 Co8 O20

Converted. The number of structures: 1
Save init_struc_data.pkl
extract_struc.pyを使えば,
init_struc_data.pklにどのように登録されたのか確認できる.
python3 extract_struc.py init_struc_data.pkl -pa
ID 0
Full Formula (Sr8 Co8 O20)
Reduced Formula: Sr2Co2O5
...
-fオプションでソートもできる.
python3 pos2pkl.py -s Sr8Co8O20X4.cif -f O Co
Removed species: {'Sr', 'X0+'}
Composition: O20 Co8

Converted. The number of structures: 1
Save init_struc_data.pkl
kpt_check.py
kpt_check.pyはkppvolを入力した際にkメッシュがどれくらいになるかをチェックすることができる.
POSCAR,CONTCAR,およびinit_struc_data.pklが読み込み可能.
pymatgenライブラリが必要.
初期構造を生成後に,kppvolの値をどれくらいにしたら良いか色々試すことができる.(下記の最後の例を参照)
使い方
このスクリプトをPATHが通ったところにおけばpython3を省略できる
usage: kpt_check.py [-h] [-w] [-n NSTRUC] infile kppvol

positional arguments:
  infile                input file: POSCAR, CONTCAR, or init_struc_data.pkl
  kppvol                kppvol

options:
  -h, --help            show this help message and exit
  -w, --write           write KPOINTS
  -n NSTRUC, --nstruc NSTRUC
                        number of structure to check
例
POSCARとkppvol
a = 10.689217
b = 10.689217
c = 10.730846
Lattice vector
10.689217 0.000000 0.000000
0.000000 10.689217 0.000000
0.000000 0.000000 10.730846
kppvol: 100
k-points: [2, 2, 2]
KPOINTSファイルの生成
POSCARおよびCONTCARを入力とする際は,-wオプションを使用することでKPOINTSファイルを生成できる.
kpt_check.py -w POSCAR 100
$ cat KPOINTS
pymatgen 4.7.6+ generated KPOINTS with grid density = 607 / atom
0
Monkhorst
2 2 2
init_struc_data.pklとkppvol
init_struc_data.pklの初期構造データに任意のkppvolの値を適用した場合のkメッシュを調べることが可能.
デフォルト設定でははじめの5構造をチェックする.
-nを使うとチェックする構造数も変えられる.
kpt_check.py -n 3 init_struc_data.pkl 100
# ---------- 0th structure
a = 8.0343076893
b = 8.03430768936
c = 9.1723323373
Lattice vector
8.034308 0.000000 0.000000
-4.017154 6.957915 0.000000
0.000000 0.000000 9.172332
kppvol: 100
k-points: [3, 3, 3]
# ---------- 1th structure
a = 9.8451944096
b = 9.84519440959
c = 6.8764313585
Lattice vector
9.845194 0.000000 0.000000
-4.922597 8.526188 0.000000
0.000000 0.000000 6.876431
kppvol: 100
k-points: [3, 3, 4]
# ---------- 2th structure
a = 7.5760383679
b = 7.57603836797
c = 6.6507478296
Lattice vector
7.576038 0.000000 0.000000
-3.788019 6.561042 0.000000
0.000000 0.000000 6.650748
kppvol: 100
k-points: [4, 4, 4]